Now you have created your Team, the next step is to set up your Team settings. In this module, we will cover the following sections:
- Outbound Caller-ID
- Uploading in Queue Audio
- Setup Voicemail on a Team
- Creating Dispositions
- Team Screen Pop
- Queue Call Back
- Setting and Measuring Team Service Level
Outbound Caller-ID
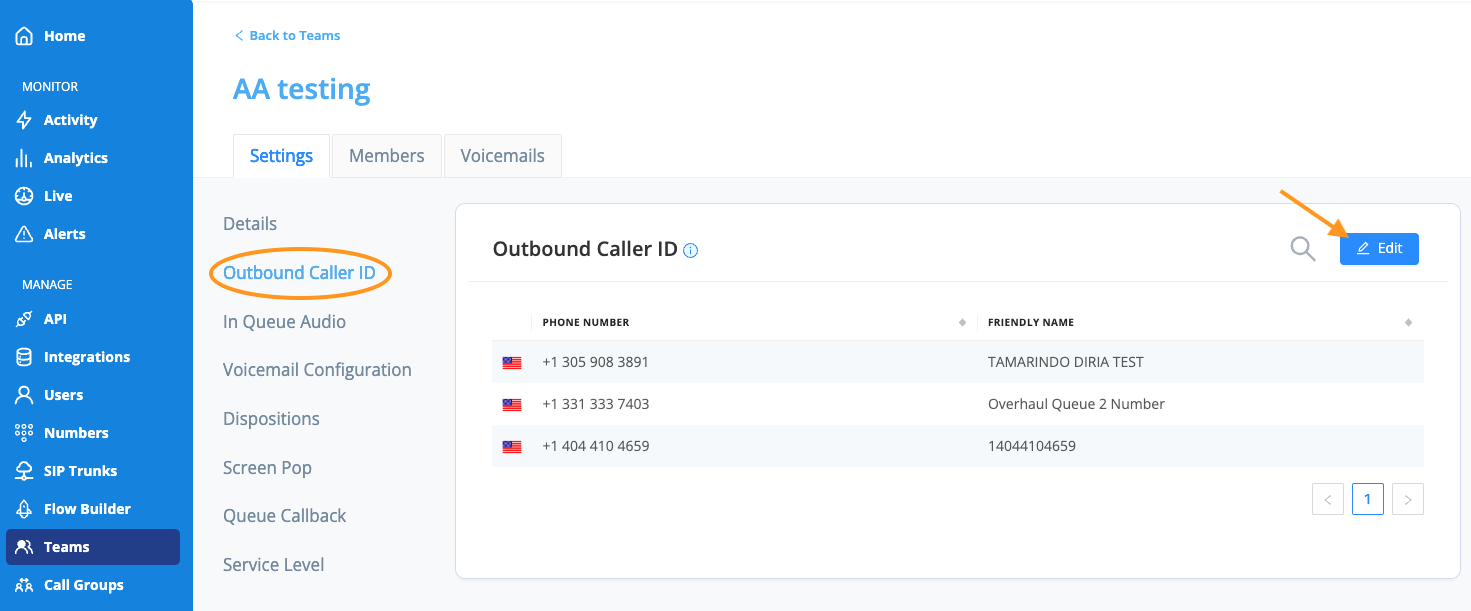
As an AVOXI Admin, you can add phone numbers for an agent to use as the outbound caller ID within a particular team. Use our below guide to add numbers to various teams.
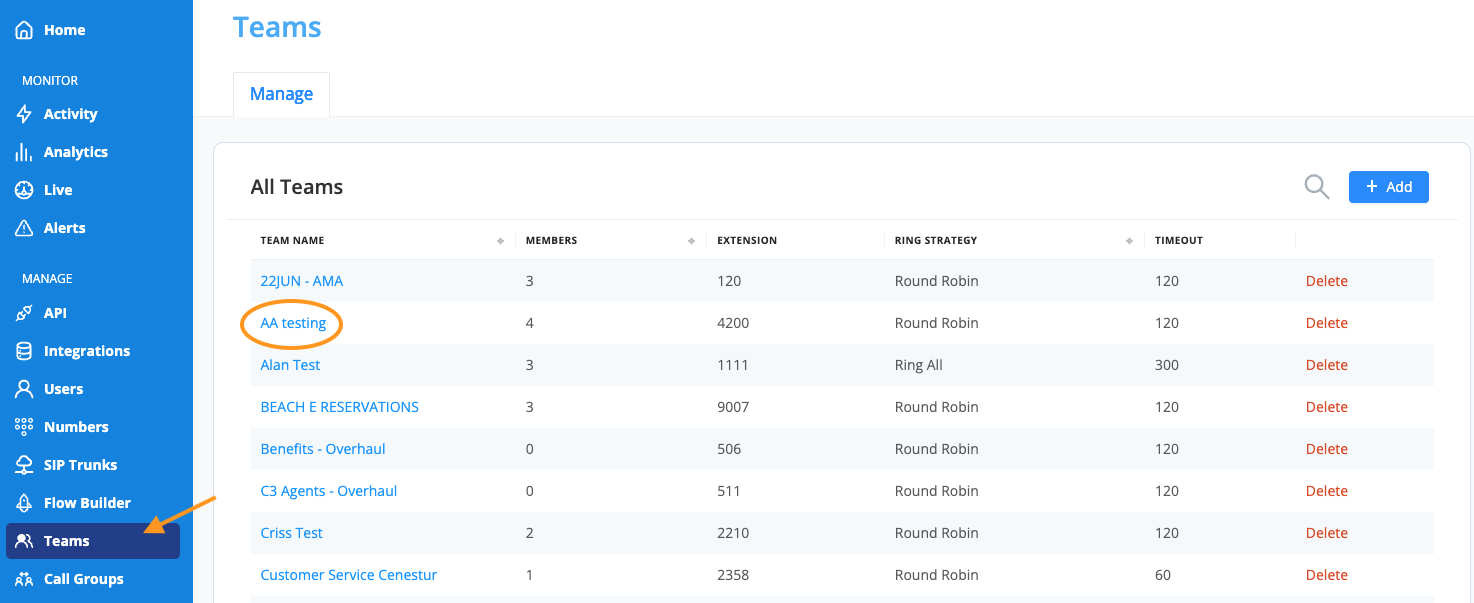
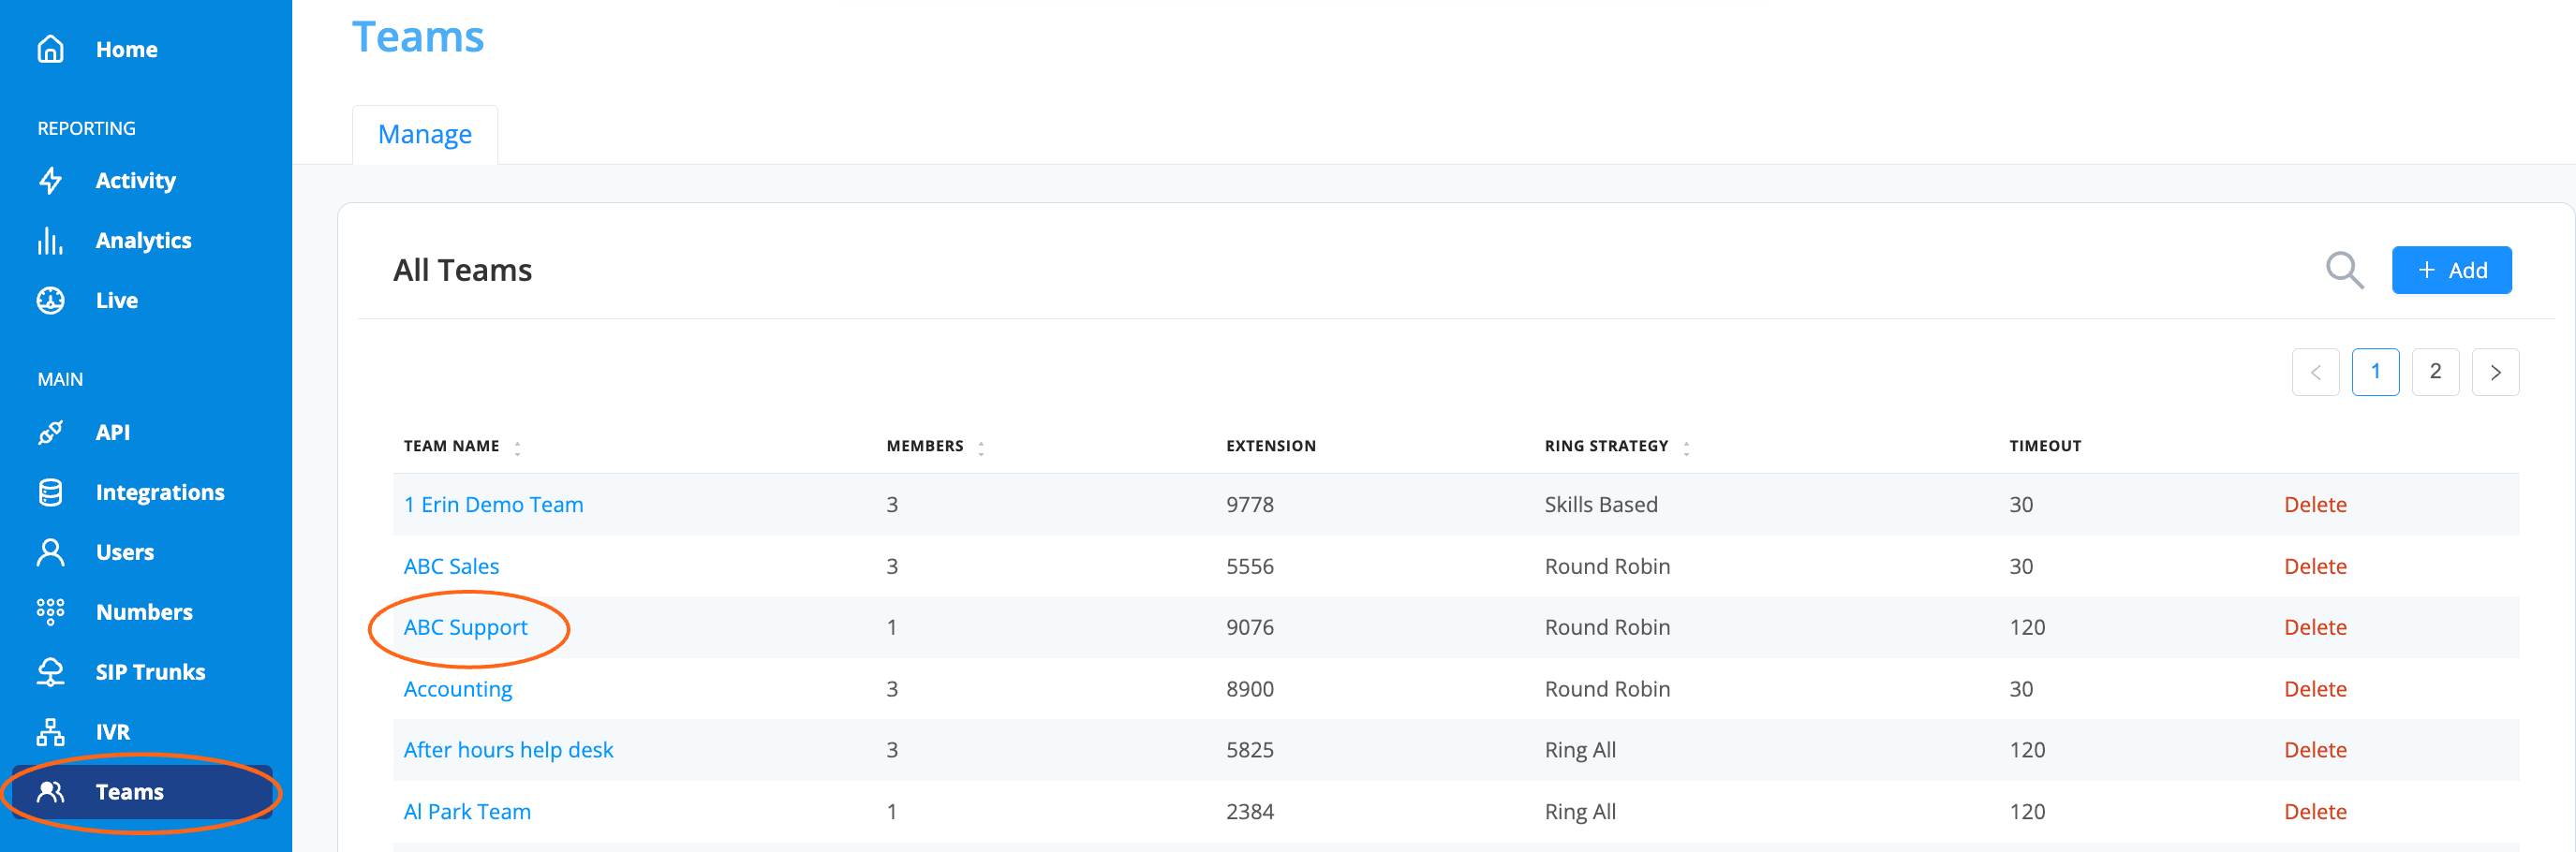
Start by selecting the "Teams" icon on the left-hand navigation bar.
Then select the team for which you want to add phone numbers to display as the caller ID when making outbound calls.

Next, select the "Outbound Caller ID" section on the "Settings" tab.
To add available numbers, click the Edit button on the top right-hand corner of the Outbound Caller ID homepage.
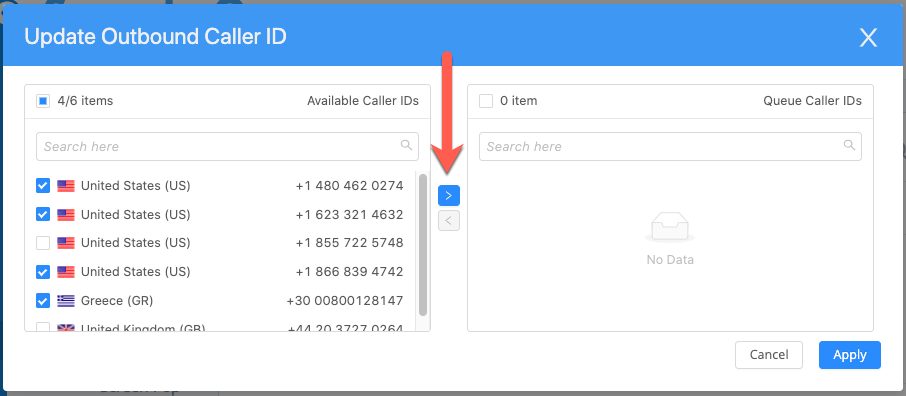
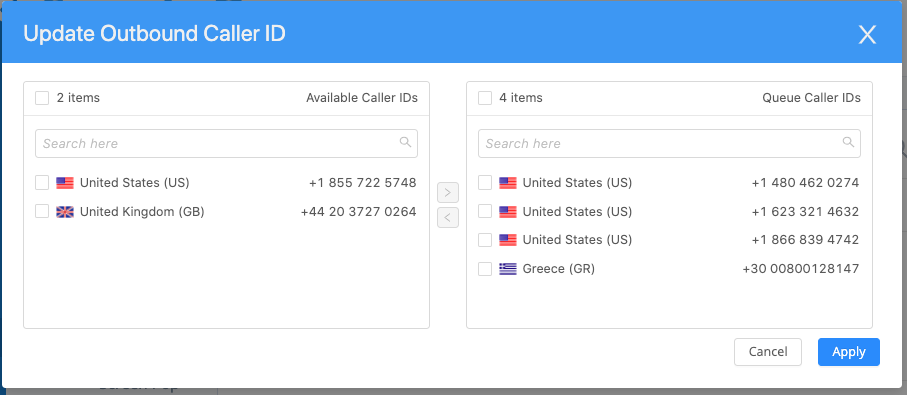
The pop-up window will list all numbers in the Available Caller IDs section.
Select which numbers you want members of the chosen team to have available as an outbound caller ID when making a call.
Move the number to the "Team Caller IDs" block/section using the center arrow. Then, click the Apply button to implement your changes.
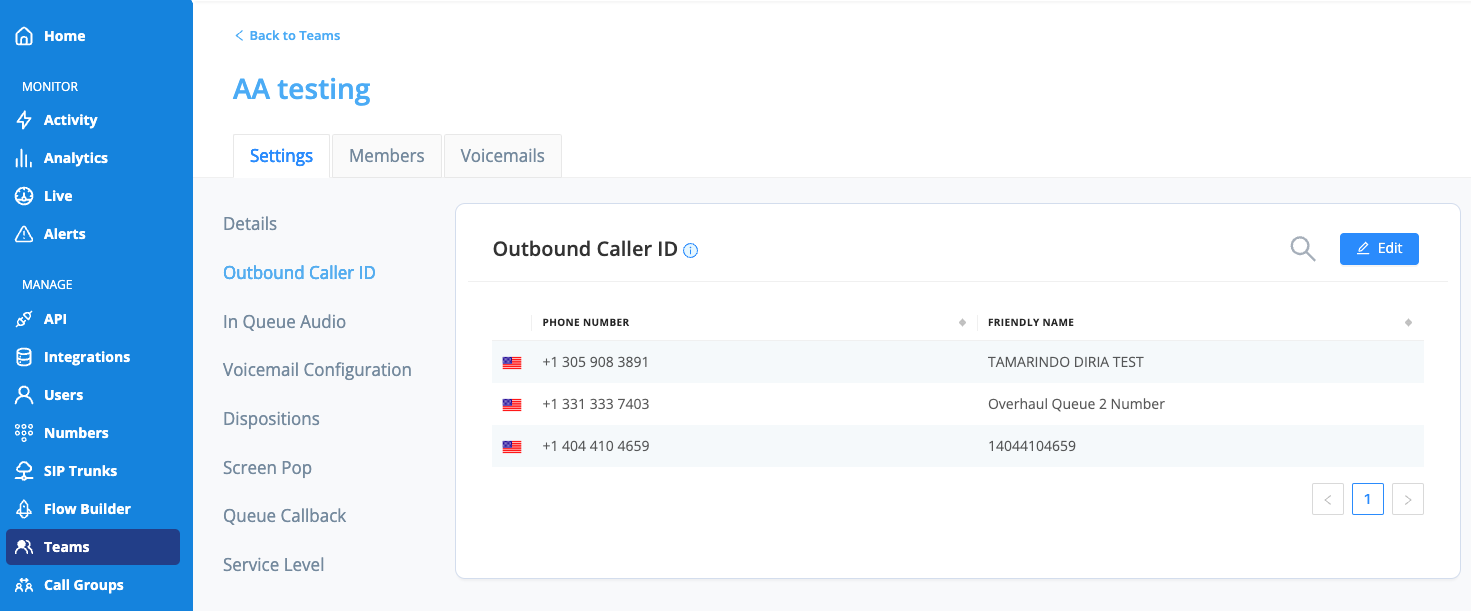
The outbound caller ID in the team -> Settings will also now reflect all of the numbers selected and available to any team member agent.
AVOXI Tip: If an agent is a member of more than one team, they will have access to all the numbers across the multiple teams they are a member of.
The FROM field under Call Activity for any outbound call will display the number used as the outbound caller ID as well as the name of the agent who placed the call. In addition, the Call Details for that particular call will also display the name and specific outbound caller ID used in the 'From' field.
For any internal call made to another agent, the FROM field will remain the extension of the agent placing the call.
AVOXI Tips
- When making a blind transfer to an external number, the person receiving the call will see the outbound caller ID and the caller who originated the call, for example:
- Caller1 calls Agent 2, then Agent 2 initiates a blind transfer between Caller 1 and an external number, and the outbound caller ID or Caller 1 will be displayed to the person receiving the call
- When making a warm transfer to an external number, the person receiving the call will see the outbound caller ID of the agent doing the warm transfer; for example:
- Caller 1 calls Agent 2, then Agent 2 initiates a warm transfer between Caller 1 and an external number, and the outbound caller ID of Agent 2 will be displayed to the person receiving the call
- Any internal calls from agents to other agents and teams will display the extension of the agent making the call, not the outbound caller ID.
- The outbound caller ID only applies to phone numbers at this time; the outbound caller ID name is not currently supported.
Note: The reliability of the outbound caller ID being displayed on the receiving person's phone can vary depending on the country and carrier of the phone service.
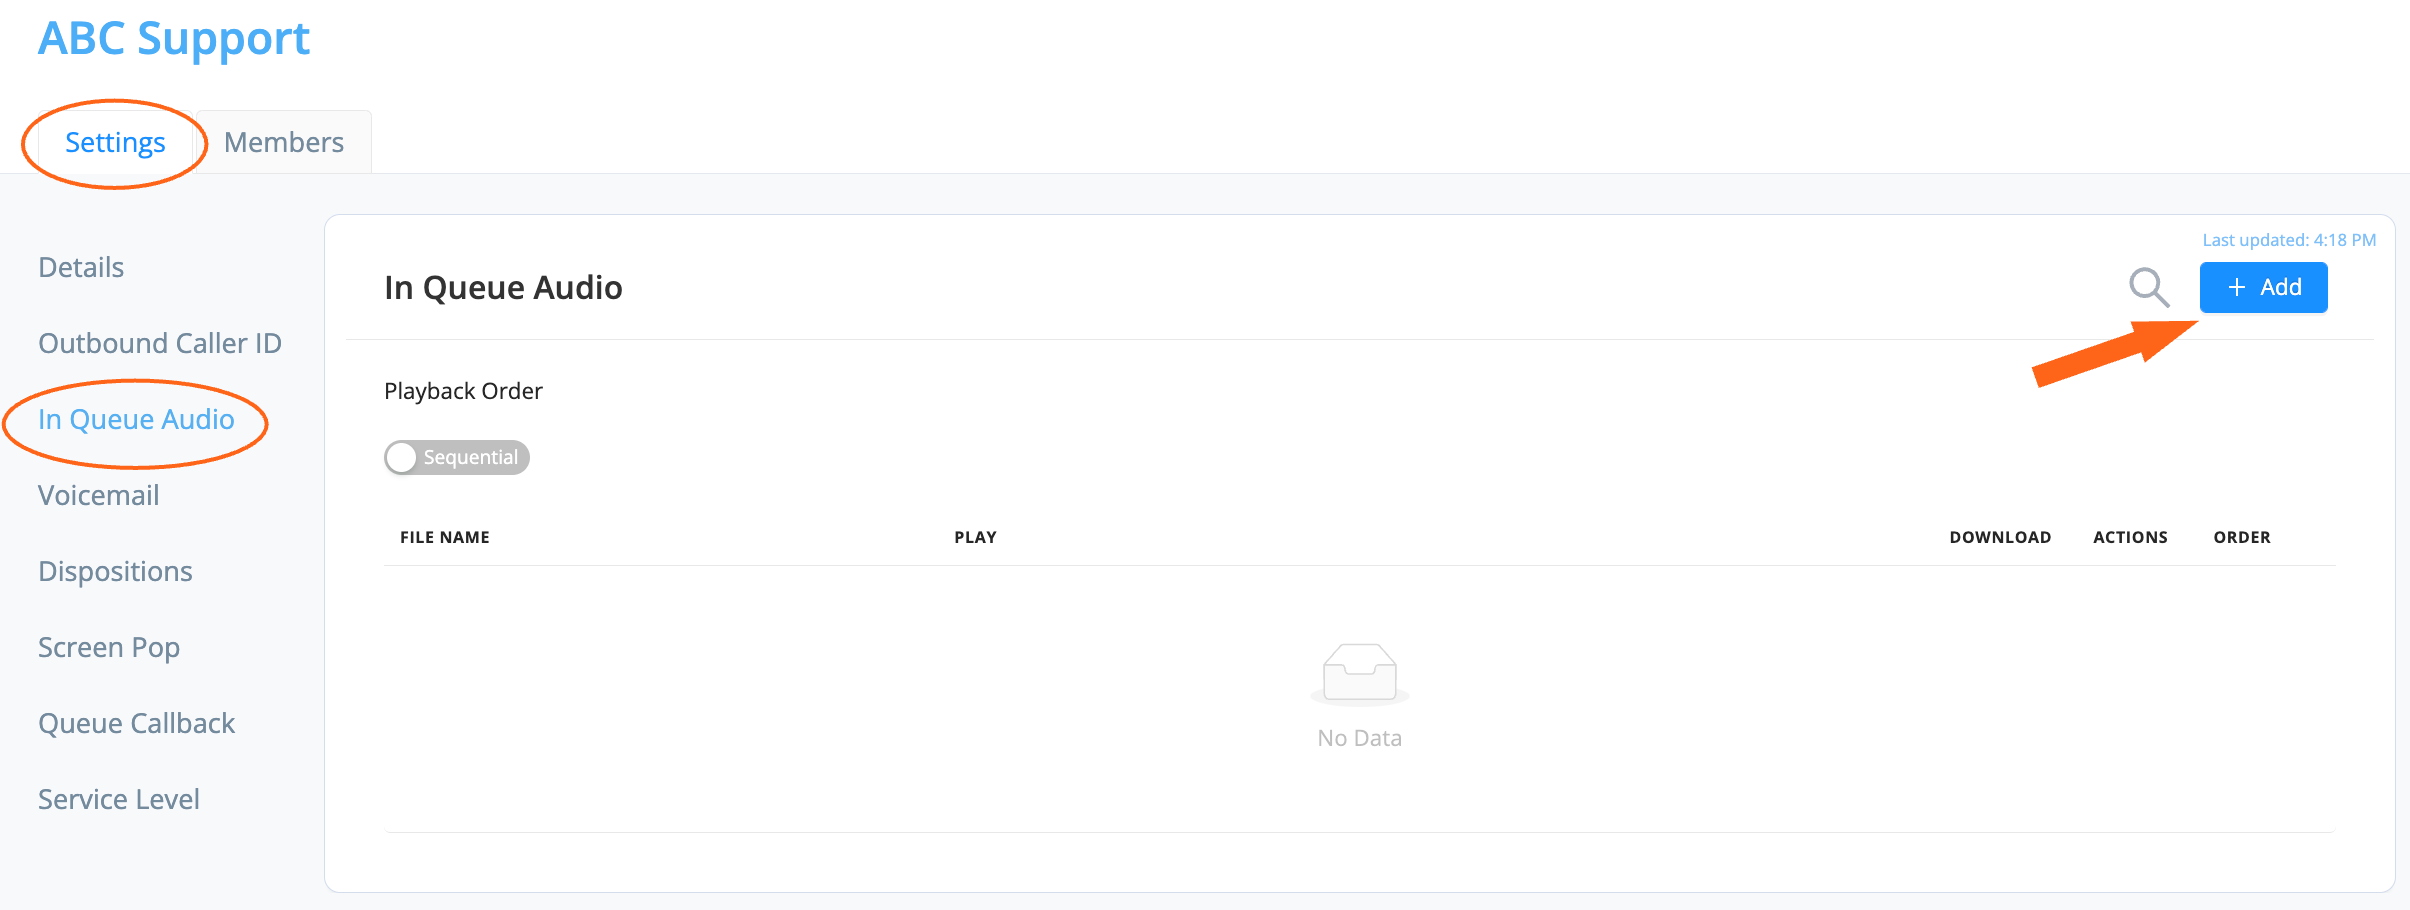
Uploading in Queue Audio
Admins have the ability to upload custom "In Queue Audio" to your call queue.
To get started select the "Teams" icon located on the left-hand side navigation bar, then select the team for which you wish to update the in queue music.
Tip: In Queue Audio music will play when a caller is waiting in queue (e.g. caller is waiting for an Agent to pick up or all Agents are busy and the caller is in queue). This is separate/different from the "on hold" music the caller will hear if placed on hold by an Agent.
Then, click the Settings tab located at the top, followed by the In Queue Audio tab.
Then select +Add to upload in queue audio.
Enter a custom file name and either drag and drop your audio file or select the upload icon ![]() .
.
Tip: You can upload multiple files that will play in order. Make sure your audio files are saved as .wav.
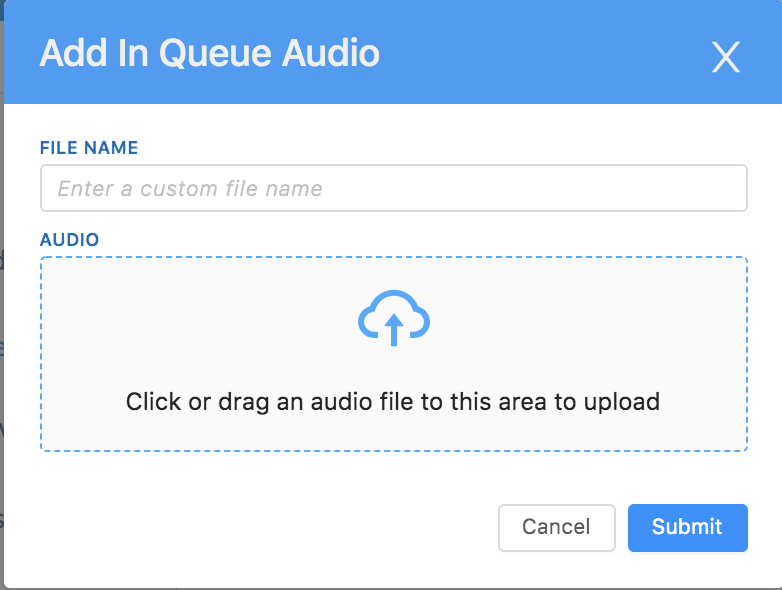
To complete, select Submit.
NOTE: It is not yet possible to delete greetings created using the Admin interface. If you wish to delete prompts that are no longer needed please email our support team at service@avoxi.com
Setup Voicemail on a Team
Configure a voicemail for your team using custom voicemail greetings. Voicemails are forwarded to an email address of your choice. Use the below steps to get started:
Configure New Voicemail
-
On the Teams section select the team you wish to update.
-
On the "Settings" tab, select the "Voicemail" section.
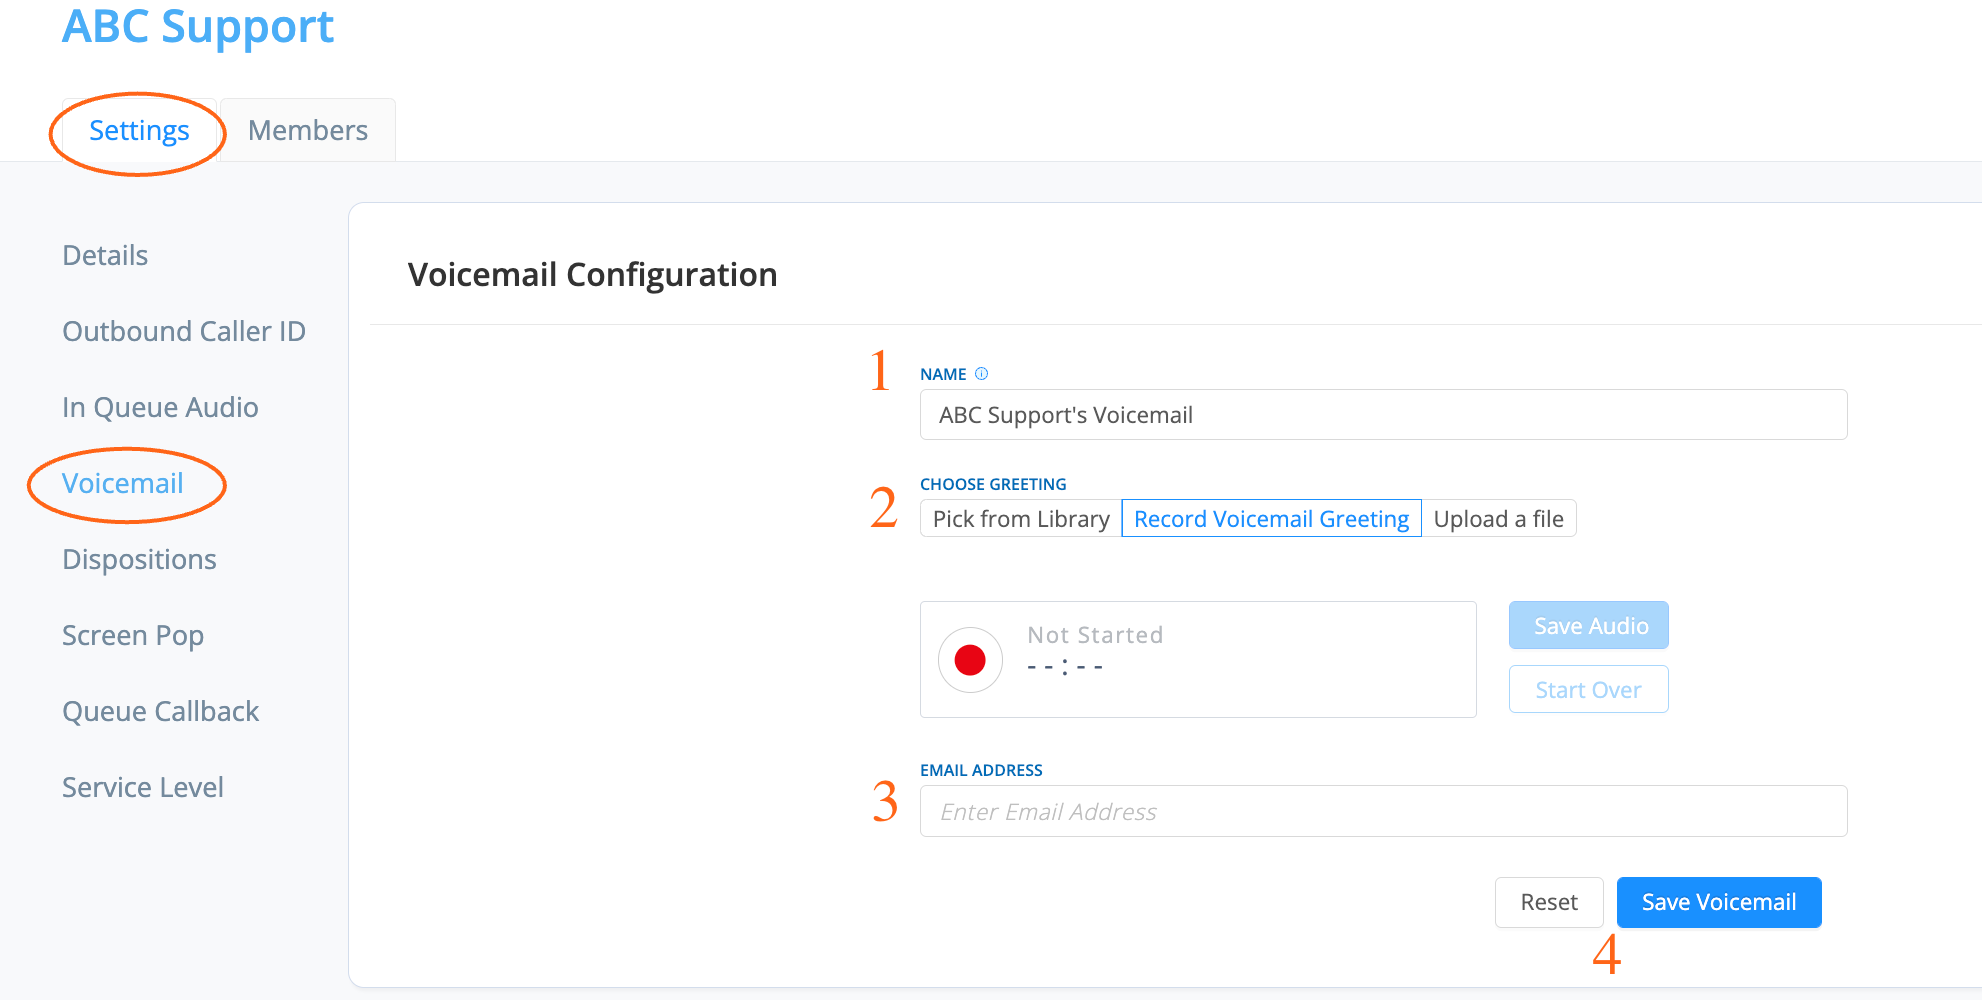
- Give your voicemail an easy to identify Name (this name will be included in the voicemail email body)
-
Choose your Greeting: You have three options to choose from
-
Pick from Library
- Choose one of our preloaded recordings by selecting the dropdown arrow
- Select Save Voicemail.
- Tip: You are able to preview and download audio files you uploaded by clicking the Play and Download button next to your selection
-
Record Voicemail Greeting
- Record your own personal greeting.
- Select the record button to start recording.
- Once finished, select the stop button
- You can playback your recording by selecting the "Play" button
 .
. - If you’re happy with the recording select Save Audio and then Save Voicemail.
-
Upload a File
- Upload a file your company already has by simply dragging and dropping the file or selecting upload
- Then make sure to select Save Voicemail.
- Tip: Make sure your audio files are saved as .wav and delete any spaces or special characters from the file's name.
-
Pick from Library
-
Email Address: Enter the email address where voicemails will be sent.
- When finished, select "Save Voicemail"
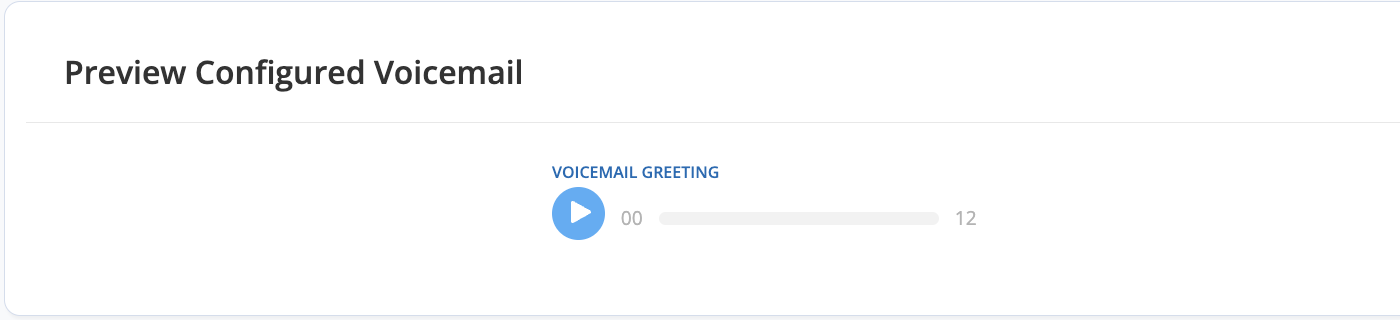
Preview Configured Voicemail
- Use the play button to preview your configured voicemail greeting
-
Use the "Reset" button to update this at any time.
Creating Dispositions
Use the below step-by-step guide to create mandatory dispositions specific to a team.
- Select the "Teams" icon located on the left-hand side navigation bar.
- Select the Team for which you wish to create call dispositions.

- Click the Settings tab located at the top, and then select Dispositions.
- Next, select the three dots icon
 located on the left-hand side and click "Add Disposition".
- Give your disposition a label, some popular examples include:
- Case Resolved
- Product Sold
- Appointment Booked
- Scheduled Demo
- Not Interested
- Next, select your rep type.
-
AVOXI Tip: As an admin, you can create as many dispositions as you wish. These will be loaded into a drop-down menu for agents to choose from.

-
Type - Freeform Text
- This allows your Agents to type in whatever they’d like when closing out the call.
- Decide if you want to make this required or optional.
- Then select Add.

-
Type - Simple Select
- This allows your Agents to choose a disposition from preset options.
- Select + Add Option and label each of your options.
- You can set up as many as you’d like by selecting the +Add Option.
- Decide if you want to make this required or optional and if you want to allow for multiple selections.
- Then select Add.

-
Type - Tree Select
- This allows your Agents to choose a disposition from the preset option but also allows the ability for sub-options.
- Select + Add Option and label each of your options.
- You can set up as many as you’d like by selecting the +Add Option.
- Then select + Add Child under any of your options to add sub-options.
- Decide if you want to make this required or optional and if you want to allow for multiple selections.
- Then select Add.
-
Required
- Using the toggle, activate the “required” control to make it mandatory for agents to complete a deposition before moving onto the next call.
-
Allow Multiple Selections
- Using the toggle, activate the "allow multiple sections" control to allow agents to select multiple selections.

- Once everything is complete, select Add.
- Using the toggle, activate the "allow multiple sections" control to allow agents to select multiple selections.
- Preview your dispositions by selecting the three dots icon
 and then Preview Dispositions.
Team Screen Pop
Select your Screen Pop template to determine the information displayed on your agent's web phone when receiving an incoming queue call. Select the empty box next to the option of your choice.
See below explanation of each option:
CRM Integration
This feature uses the caller ID of the incoming call to look up the corresponding contact within your configured CRM. The contact information is then fetched from your CRM and displayed within the Agents webphone.
Disable Screen Pop
Select to ensure no contact information is displayed in a screen pop.
Use Company Default
Display a screen pop using your company's default template if configured.
Queue Call Back
The queue callback feature helps agents manage queue call volume during peak times, improves the customer experience by removing long wait times on the line, and reduces calling costs.
Once the caller selects a callback key, their call is ended; they will remain within the queue until an agent becomes available. The queue timeout controls the total amount of time the caller waits until a callback occurs. The timeout and ring strategy can be configured and updated by an administrator under the team's settings.
AVOXI Tip: When queue callback is enabled, we recommend you set your Ring Strategies to Round Robin.
Agent Receiving the Callback
- Once the agent becomes available, they will automatically hear the following message: "This is a callback call, beginning call."
- If the contact center has a CRM / Helpdesk integration setup, the agent will be presented with a screen-pop that contains the caller's information.
- If a caller moves from one team to another, they will hear the Queue Callback prompt each time they enter a new queue.
- If the call recording is enabled, all calls will automatically be recorded. In addition, agents can pause recording via the web phone.
Blocking a Callback
- If a caller does not display their incoming Caller-ID or the number is listed as blocked, the caller will NOT be given the callback option.
- The Queue Callback prompt will play before the pre-set IVR prompts.
Rejecting the Callback
- If the agent/user rejects the Queue Callback once they become available, it will automatically search for the next available agent.
Setting and Measuring Team Service Level
Service Level is defined as the percentage of incoming calls to a Team that is answered by an agent within a set amount of time. "Average Time to Answer" is a key performance indicator used by call centers to help monitor caller wait time and agent performance. Genius Admins and Supervisors can track agents' average time to answer incoming calls via the "Teams report". This helps improve the overall customer experience while giving managers the ability to measure agents' performance and highlight areas that require further attention.
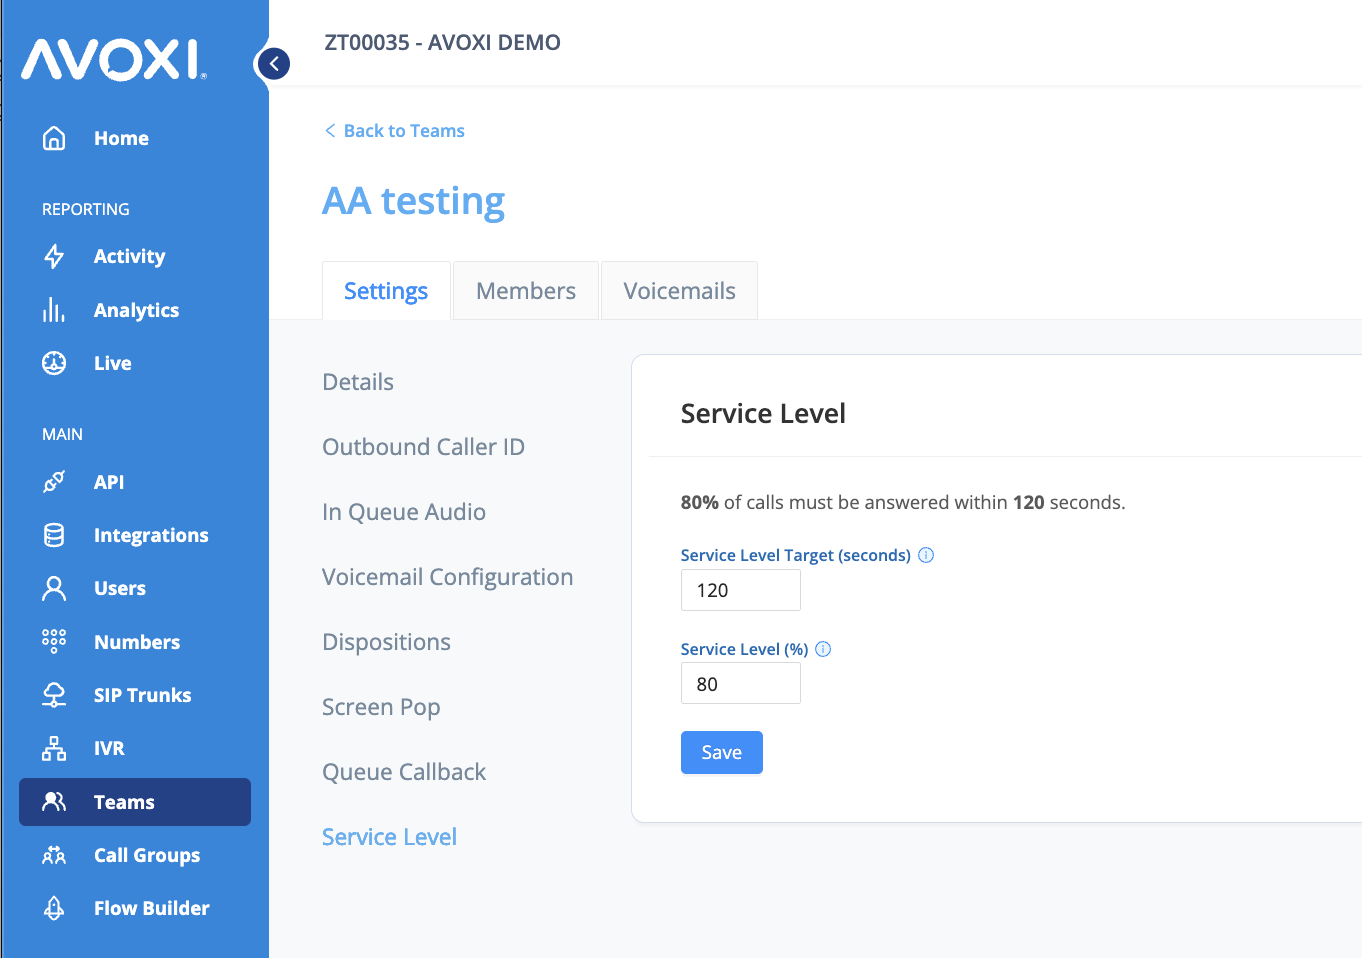
The Service Level is determined on an individual Team basis and is configured with a Service Level (%), which is the percentage of calls answered within the Service Level Target (seconds). For example, a Service Level of 80% with a Service Level Target of 120 seconds can be seen as '80% of calls must be answered with 120 seconds' to meet the Service Level. This configuration is under the Team Settings and an example is below:
How to measure Service Level
There are multiple ways to measure the actual Service Level over a period of time. To see an average of all Service Level metrics for every Team in an organization, follow the below steps:
- To get started log In to your Genius account.
- Next, select the "Analytics" section located on the left-hand side navigator.
- Then click the "Teams" tab located on the top left of your Analytics homepage.
- A summary of the overall Service Level percentage, as well as Avg Agent Time to Answer, Avg Wait Time, and other Service Level metrics are available. A screenshot of a sample Teams summary is below
Genius Tip: You can update your dashboard at any time using the filter and date picker.
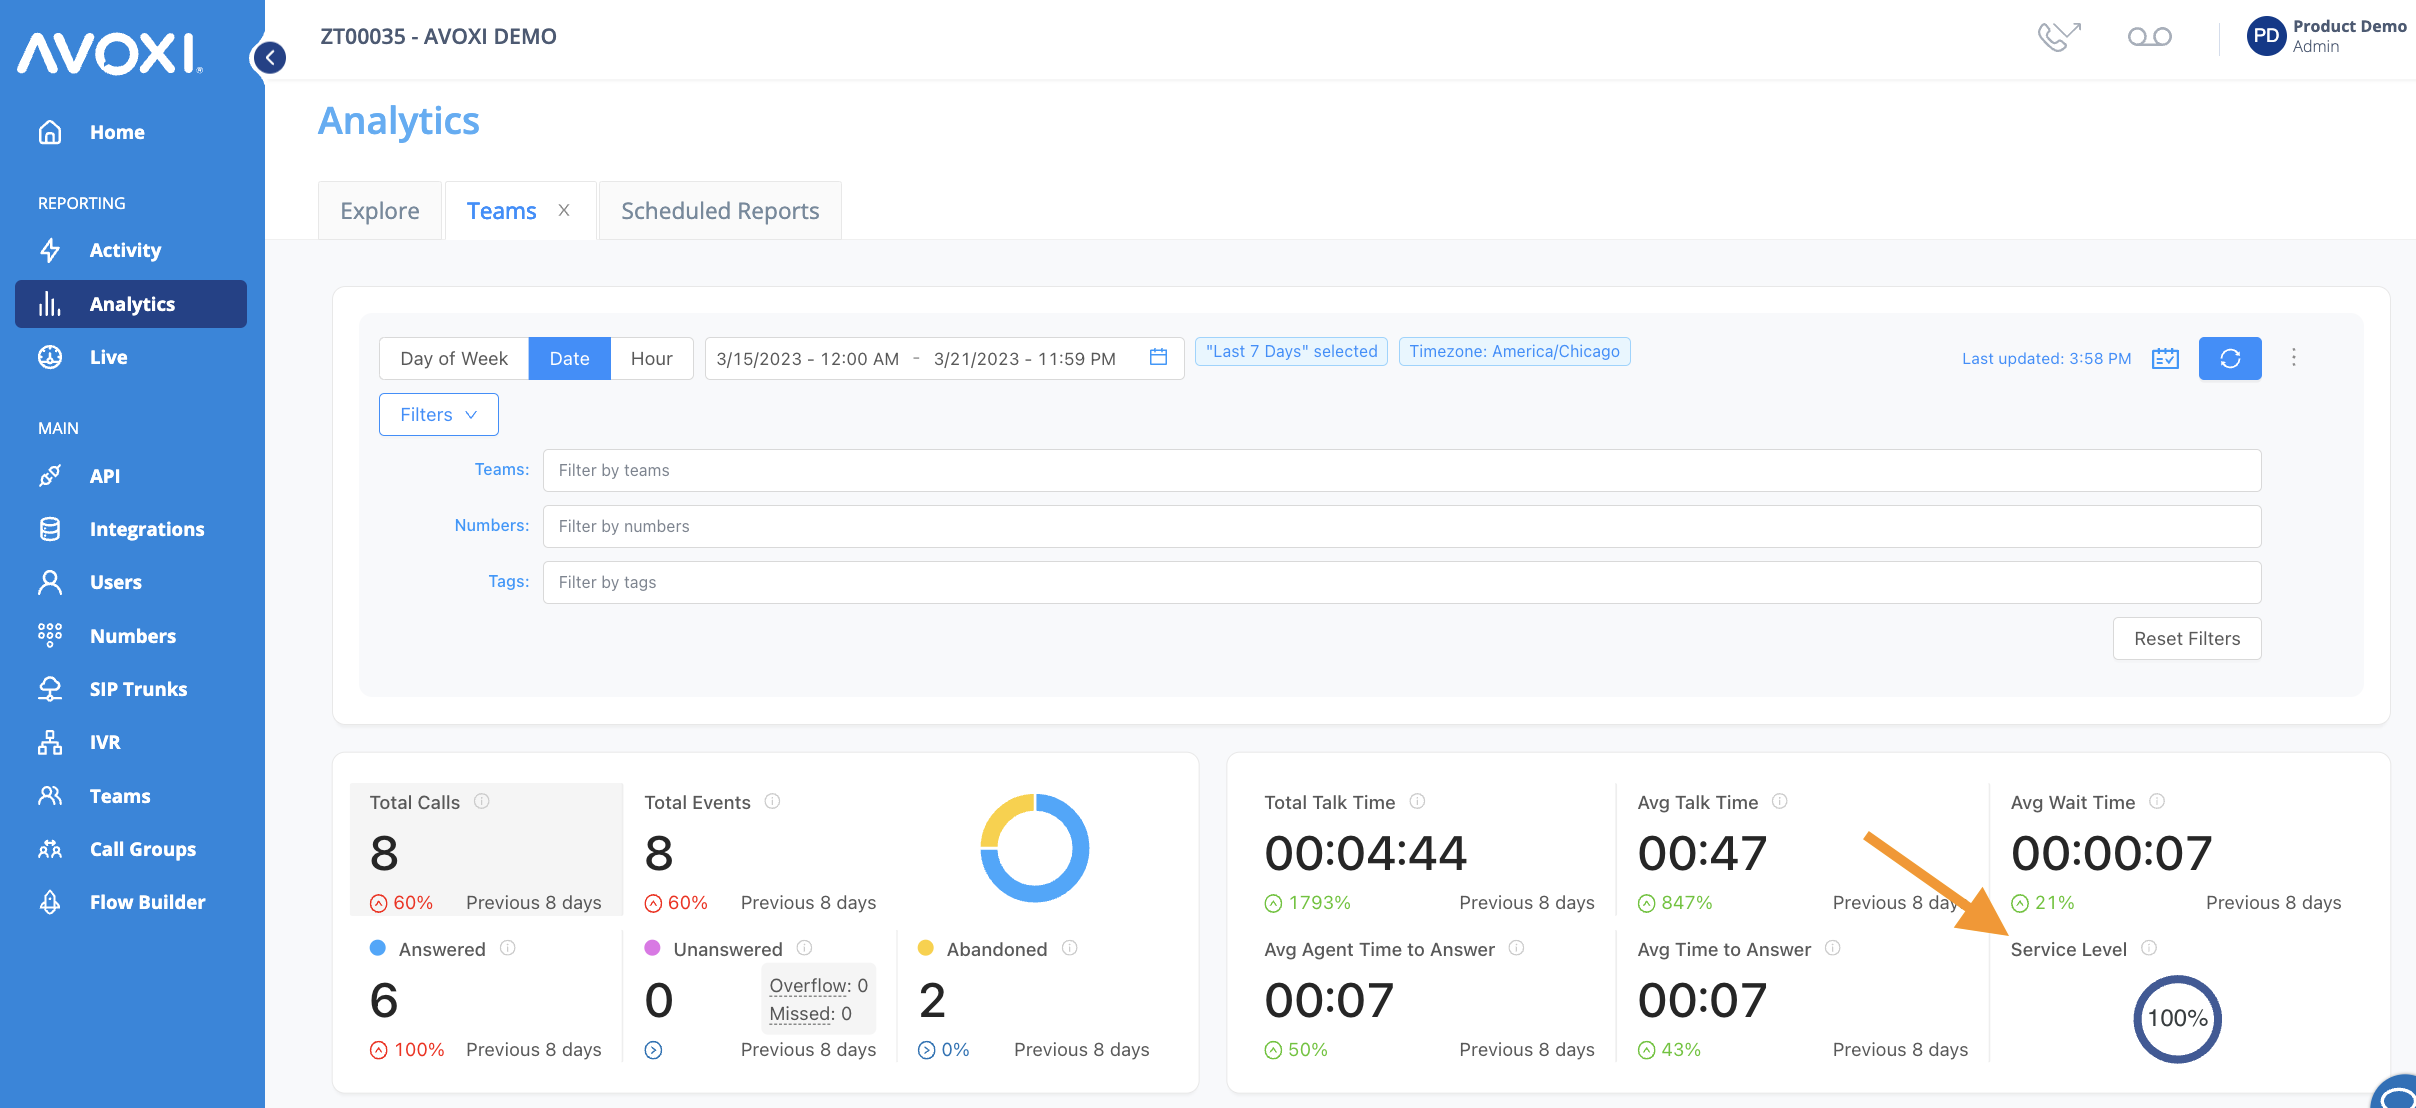
Once the filter settings of your Inbound Teams dashboard are correct/updated, scroll down to view the "Call Distribution" over the selected time in the dashboard located at the bottom of your screen.

Genius Tip: Only answered or missed inbound calls, during business hours are measured. Outbound calls, abandoned queue calls, and calls that go to voicemail are not tracked.
To view individual Team Service Level metrics, filter by the team in the above Teams tab or view our Advanced Reporting in Analytics.
Learn more about Service Level Agreements (SLAs) and how they impact your business here.