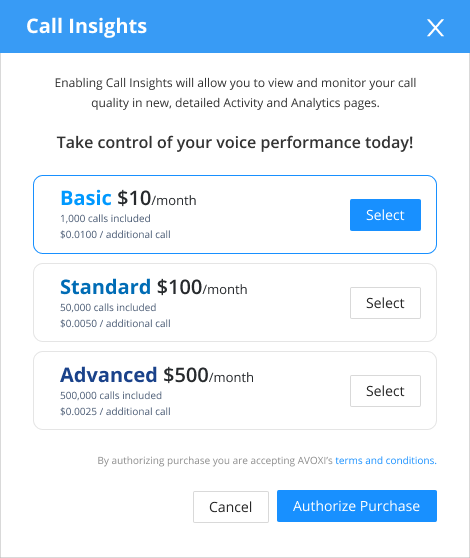
The Call Insights feature gives greater visibility into the quality of each Call, showing weekly, monthly, and daily Mean Opinion (MOS) on all answered calls. Available as an add-on feature, all new AVOXI customers can opt into 60-day Free Trial on our Basic plan, including 1,000 calls and a minimal overage rate of $0.0100 per Call. As an AVOXI Admin, you can instantly upgrade your plan at any time via your AVOXI online platform. With three competitive pricing plans, you can select a package based on your estimated call volume (standard overage fee applies). Once activated, AVOXI Admins can drill down into call details and review to instantly address quality issues.
Automatic Renewal: As an AVOXI Admin, you must cancel the subscription within the 60-Day Free Trial period, after which time you will automatically be billed the Basic plan monthly recurring cost.
For decades Mean Opinion Score (MOS) has been a commonly-used metric to measure the overall voice call quality. A MOS score of 4 or higher is generally considered a good quality call. If MOS is 3.5 or below, we recommend you look at which input metrics most impact the score. Then, use our metrics guide to review the various items that cause poor call quality issues and recommendations on addressing them.
Use the below quick links to skip ahead:
Enabling Call Insights
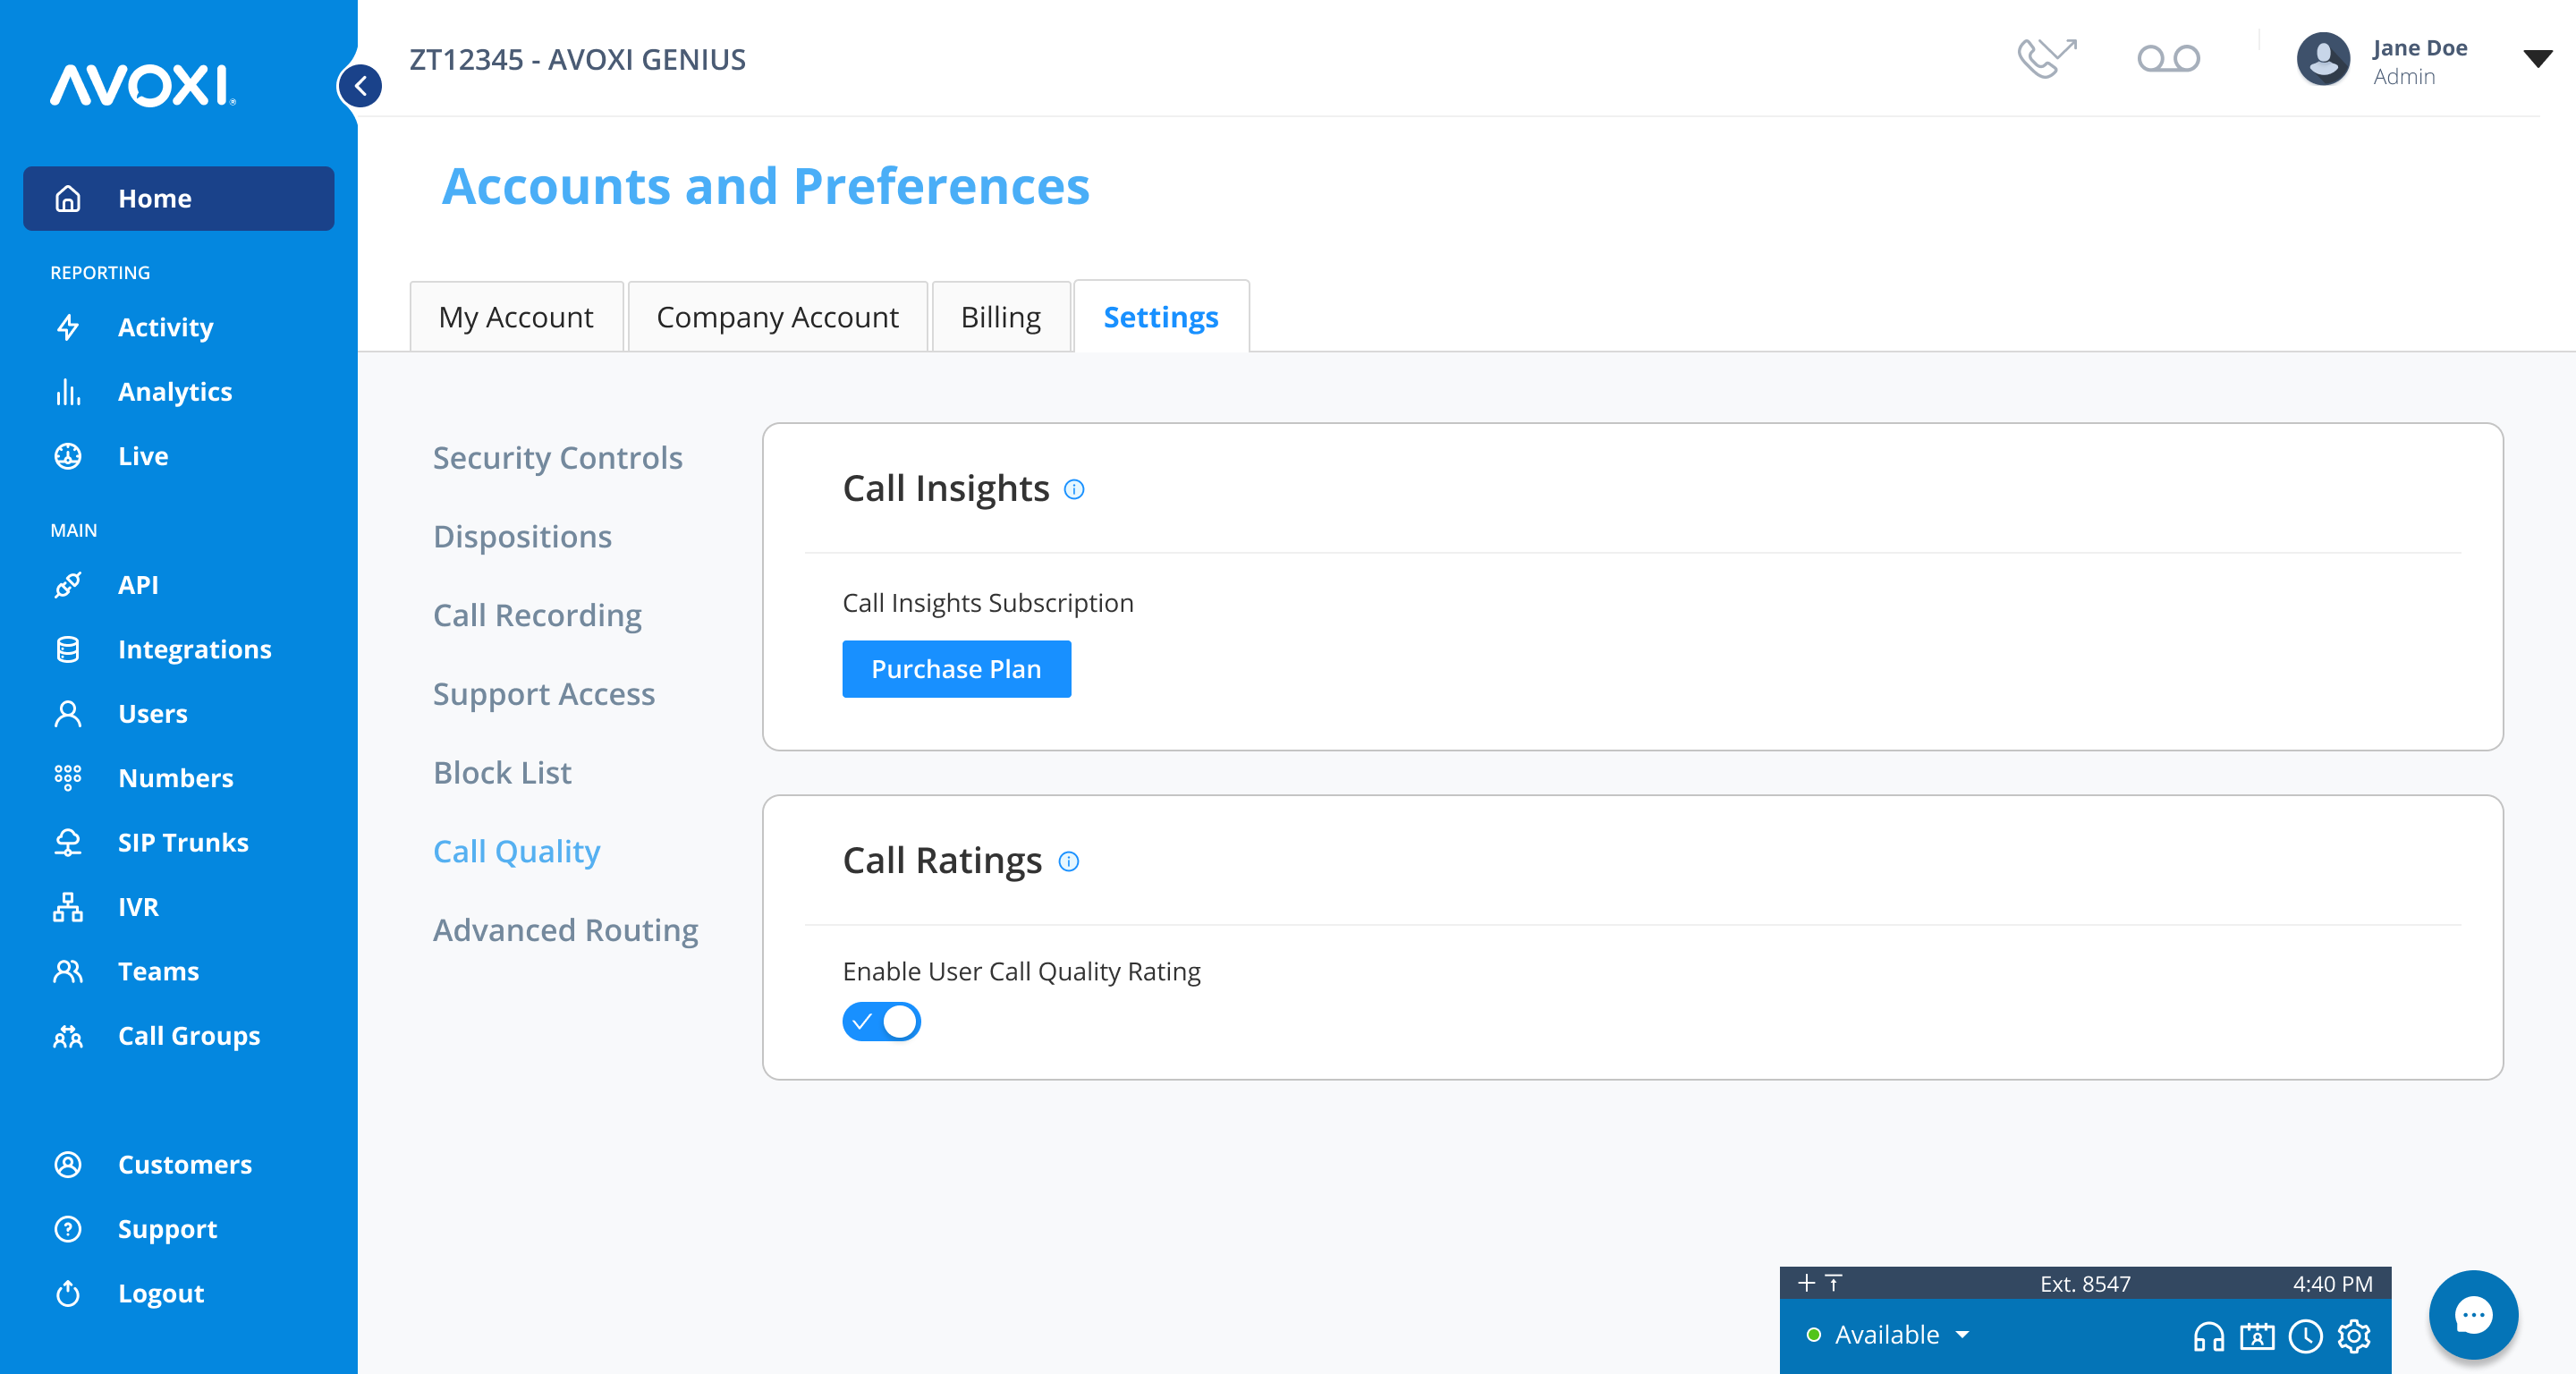
AVOXI users with Administrator or Billing Administrator Roles can enable or disable the Call Insights feature at any time at an organization level. Once activated, all completed calls will receive a quality score.
- To get started, login into your AVOXI account as an Admin.
- Select the "Home" section located on the left-hand sidebar.
- On the Accounts and Preference page, select the "Settings" tab.
- Click the "Call Insights" section.
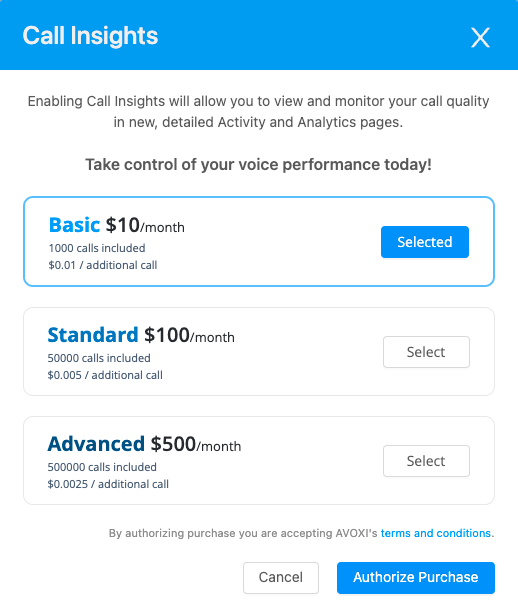
- Use the "Purchase Plan" button to view available plans.
- Next, click the "select" button located next to the plan of your choice.
- When you are ready, use the "Authorize Purchase" to complete your purchase.
PLEASE NOTE: It may take up to a minute for the activation to reflect within your account.
Cancel, View, or Change your Call Insights Plan
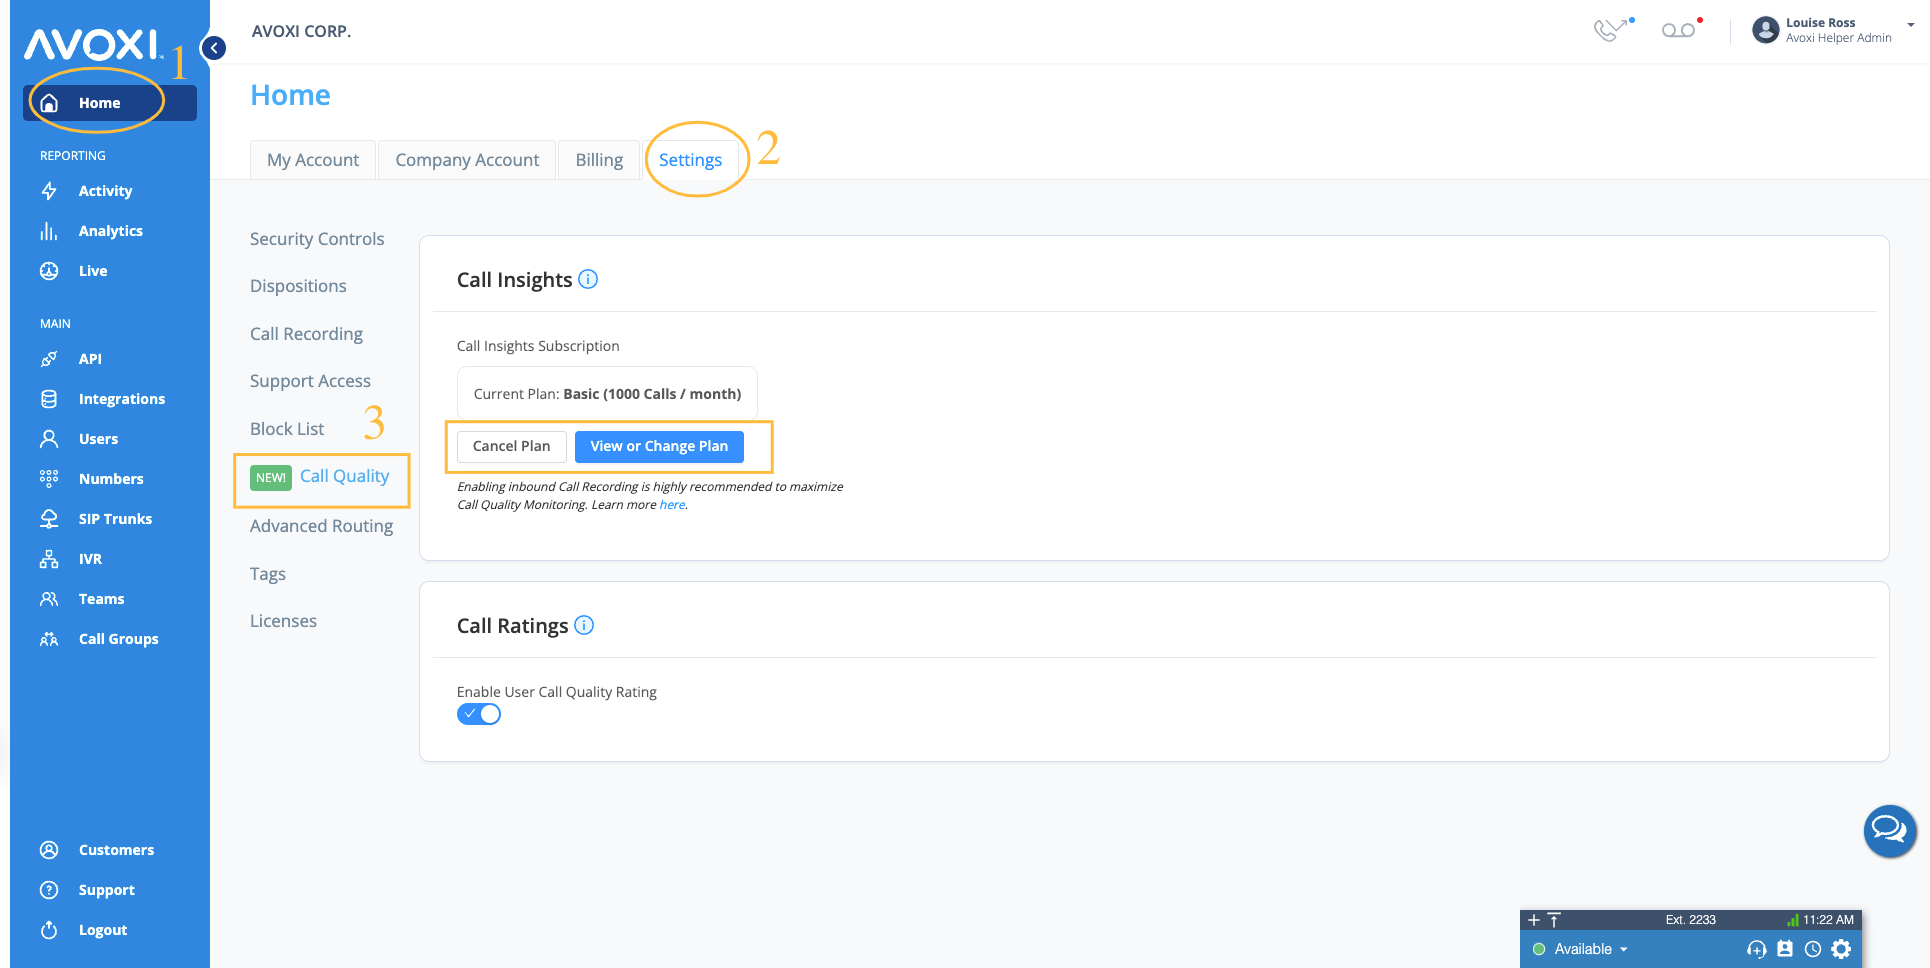
As an AVOXI Admin, you can cancel and upgrade/downgrade your plan via your online account.
- Select the "Home" section located on the left-hand navigation bar.
- Click the "Settings" tab,
-
Next, select the "Call Insights" section.
Canceling your Call Insights Subscription
As an AVOXI Admin, you can cancel/end your Call Insights subscription.
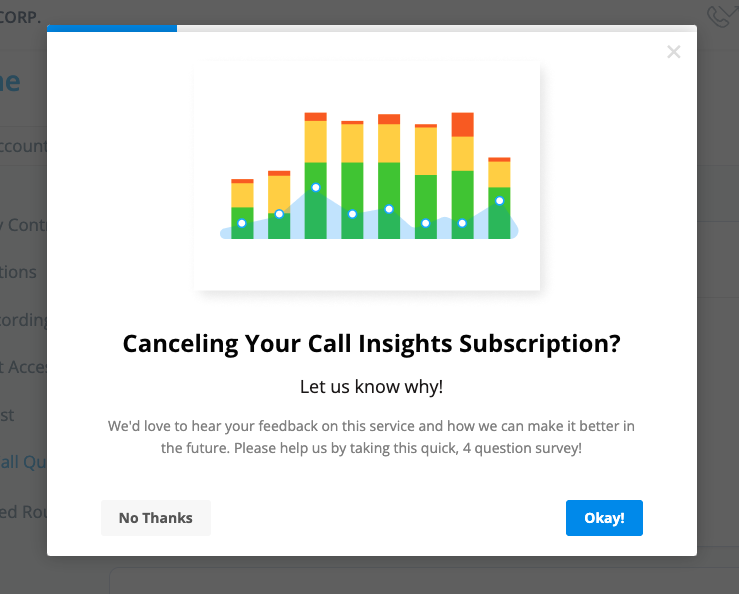
- To get started, select the "Cancel Plan" button.
- Confirm "Yes" on the pop-up screen

- Lastly, complete the four questions survey.
Upgrading your Plan
As an AVOXI Admin, you can view, upgrade or downgrade your current Call Insights plan to ensure you are on a plan that best matches companies' usage.
- To get started, select the "View or Change Plan" button.
- Select the plan of your choice.
- Use the "Purchase Plan" button to view available plans.
- When ready, select the "Authorize Purchase" to complete your upgrade.
Note: If you cancel or change your feature plan, you must log out and log back in for the change to take effect.
Editing User Roles
AVOXI Admins can customize agents' roles to give them visibility to the Call Insights Dashboard. Using the steps outlined under "Editing an Existing Role" in our Role-Based Access user guide, you can do this.
Reviewing your Dashboard
Explicitly designed to improve customer experience, the AVOXI Call Insights Dashboard shows weekly, monthly, and daily Mean Opinion Scores (MOS) on all answered calls. AVOXI Admins can drill down into call details and review and, if required, instantly open a support case. Note: Enabling Inbound Call Recording is highly recommended to maximize Call Quality monitoring.
- Select the "Analytics" section on the left navigation bar to get started.
- Next, select the "Call Insights" card.
- Filter by date and timezone using the drop-down selector located in the top right corner to select the desired date range:
- By default, the dashboard will use your account Timezone
- Using the shortcuts to choose the time interval
- Use the “Filters” dropdown to filter by Number(s), User(s), or SIP Trunk(s) for your dashboard visualization.
-
MOS scores are broken down into the below significant factors:
- Packet Loss: This occurs when one or more packets of data traveling across a computer network fail o reach their destination.
- Jitter: Related to the variation in the delay of the delivery of packets, causing some pacts to arrive out of order
- Note: Calls will only receive a quality score once they are completed.
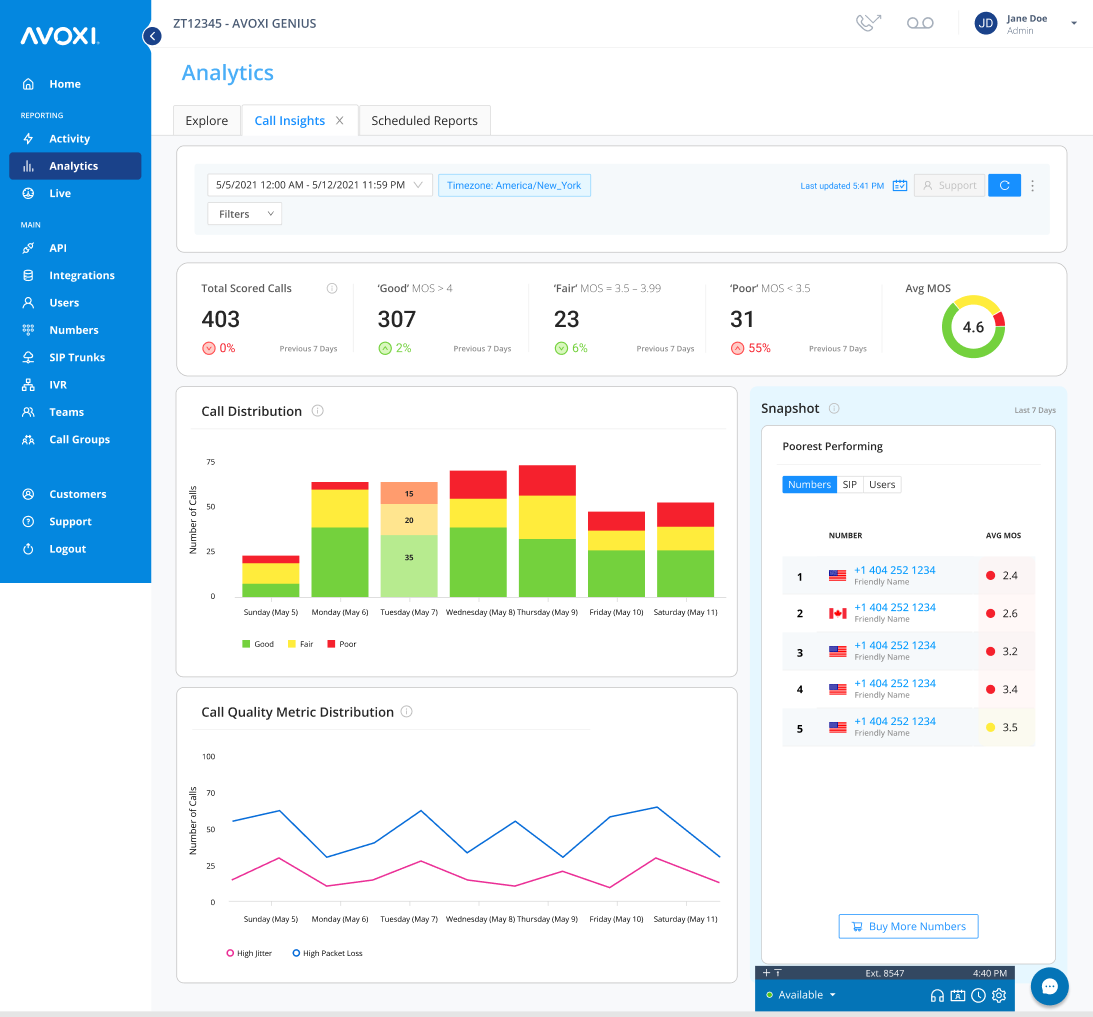
- Clicking on the Total Scored Calls, Good (MOS ≥4), Fair (MOS = 3.5-3.99), or Poor (MOS <3.5) will take you to the Call Insights Activity page to view the specific calls driving the report

- Click on the specific Number, SIP, or User in the Poorest Performing widget will take you to the Call Insights Activity page to view the specific calls impacting the MOS.

Call Insights Detailed Report
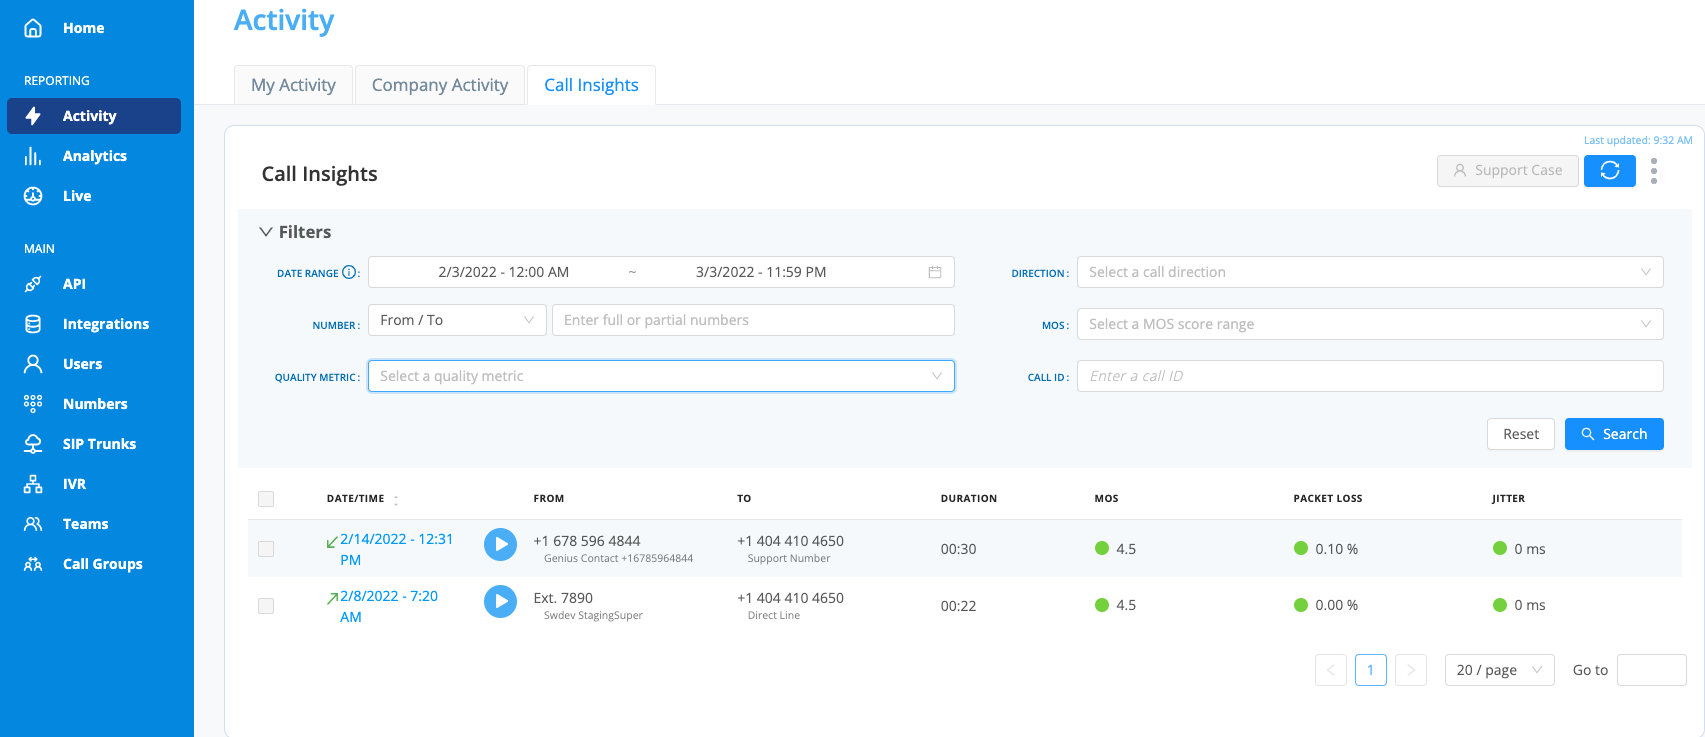
- AVOXI Admins can drill into the call details, which can be viewed by selecting the "Activity" section on the left-hand navigation bar.
- Click the "Call Insights" tab.
-
You can now filter and view the call data related to the selected number(s) using the below search criteria:
- Date Range: Filter call activity reports by date and time range
- User: Using the drop-down, you can filter by user.
- Direction: Use the call direction to filter by an inbound, outbound, or internal Call.
- Number: Filter your report by one or multiple numbers.
- MOS: Filter by MOS score range.
- Quality Metric: Filter by High Jitter or High Packet Loss.
- Caller ID: Enter a call ID to filter only calls with that caller ID.
- SIP Trunk: Select the Trunk to filter by all calls on that SIP Trunk
- Data Center: Select the Data Center to see all calls on that Data Center
- When ready, select the "Search" button.
- Enabling Inbound Call Recording is highly recommended to maximize Cal Quality Monitoring.
- Select the three dots to download your report to a CSV file (Please note a CSV file is currently limited to a maximum of 2500 rows).
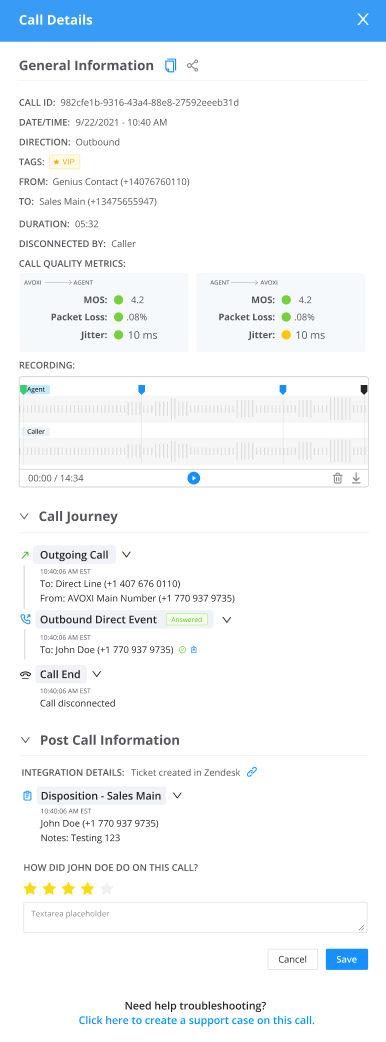
- To drill down into an individual call, click the call date.
-
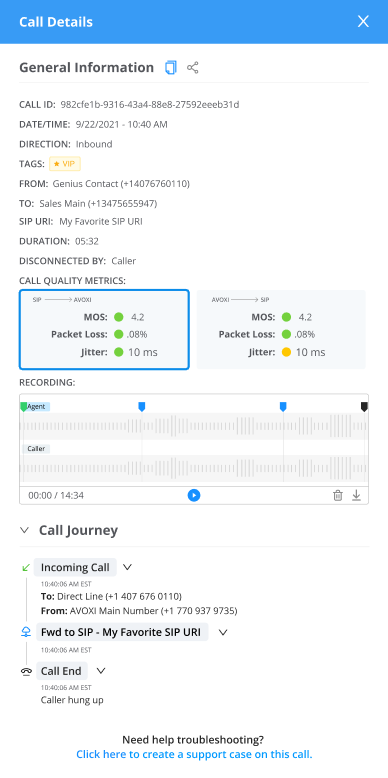
- The pop up will include:
- Call ID
- Data/Time of call
- Direction
- From/To
- Duration
- Recording Reason
- Call Quality Metrics at each leg of the call
- Call Recording
- Call Journey
- Post Call Information
- The pop up will include:
Creating a Scheduled Report
Scheduled Reports in AVOXI
Scheduled Reports gives Genius license holders with Admin/Supervisor Roles the a...
Scheduled Reports gives Genius license holders with Admin/Supervisor Roles the ability to proactively send prebuilt reports containing relevant business metrics to internal users and specific email addresses at specified intervals. For example, a scheduled report may be sent out once a week on a Thursday at 9 am. Reports can be built using specific parameters with options to filter by team, agent, numbers, outbound calls, or snapshots. Once set up, scheduled reports will automatically update the data using the predefined settings for that frequency. The robust feature helps managers proactively monitor their team's performance and automatically delivers real-time metrics to the right users.
Creating a Scheduled Report
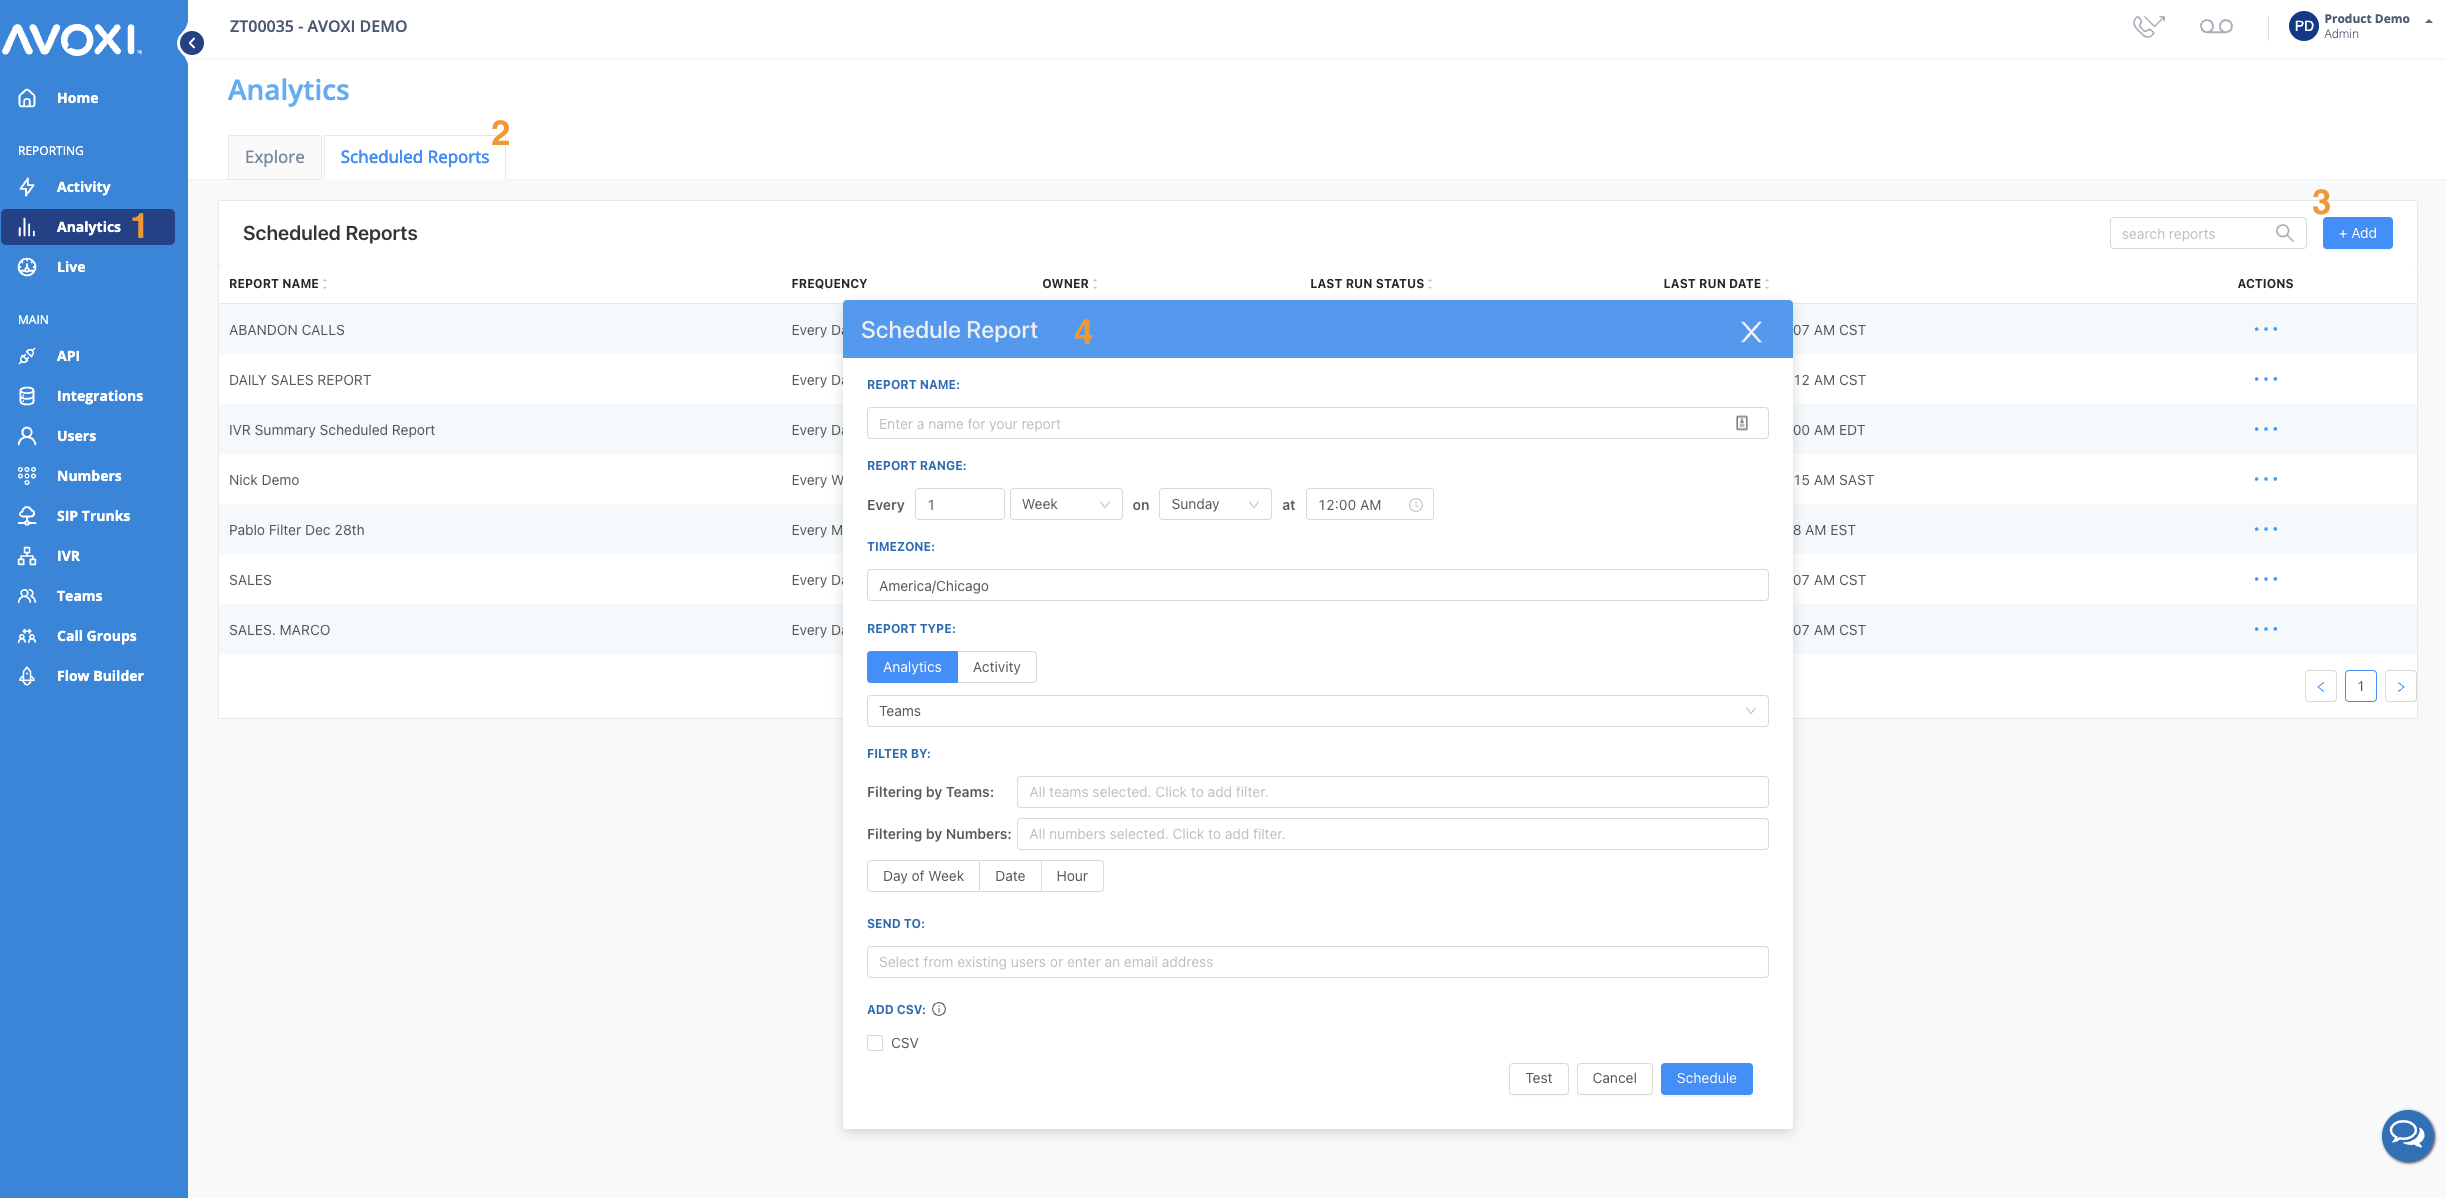
- Select the "Analytics" tab located on the left navigation bar.
- On the "Scheduled Reports" select the "+Add" button.
-
Next, complete the below information to create your scheduled report:
- Report Name - Give your report an easy to recognizable name (You can not duplicate report names).
- Report Range - Determine your frequency ie reports can be sent daily, weekly, and monthly. Select the day and time you want reports sent.
- Timezone - Supervisors can schedule reports based on a specific timezone that contains more detailed information about the callers and share them with others in relevant time zones. (The default timezone is set to the location of the user).
- Report Type - Confirm the report/dashboard type and filters are correct.
-
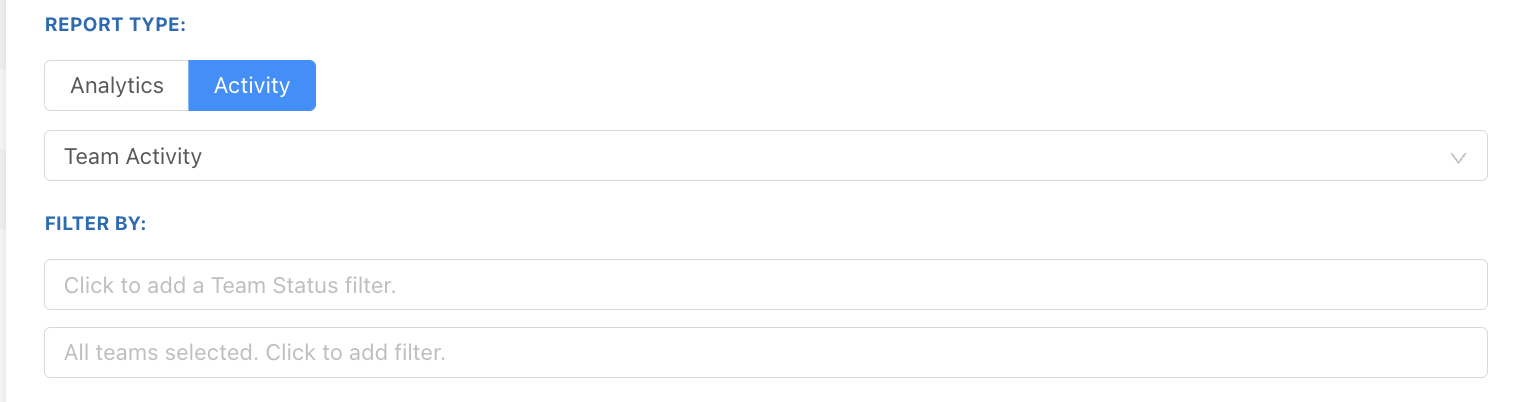
Filter By - Teams / Numbers
- When scheduling a Team Activity report, you can filter by Team and/or Team Status.
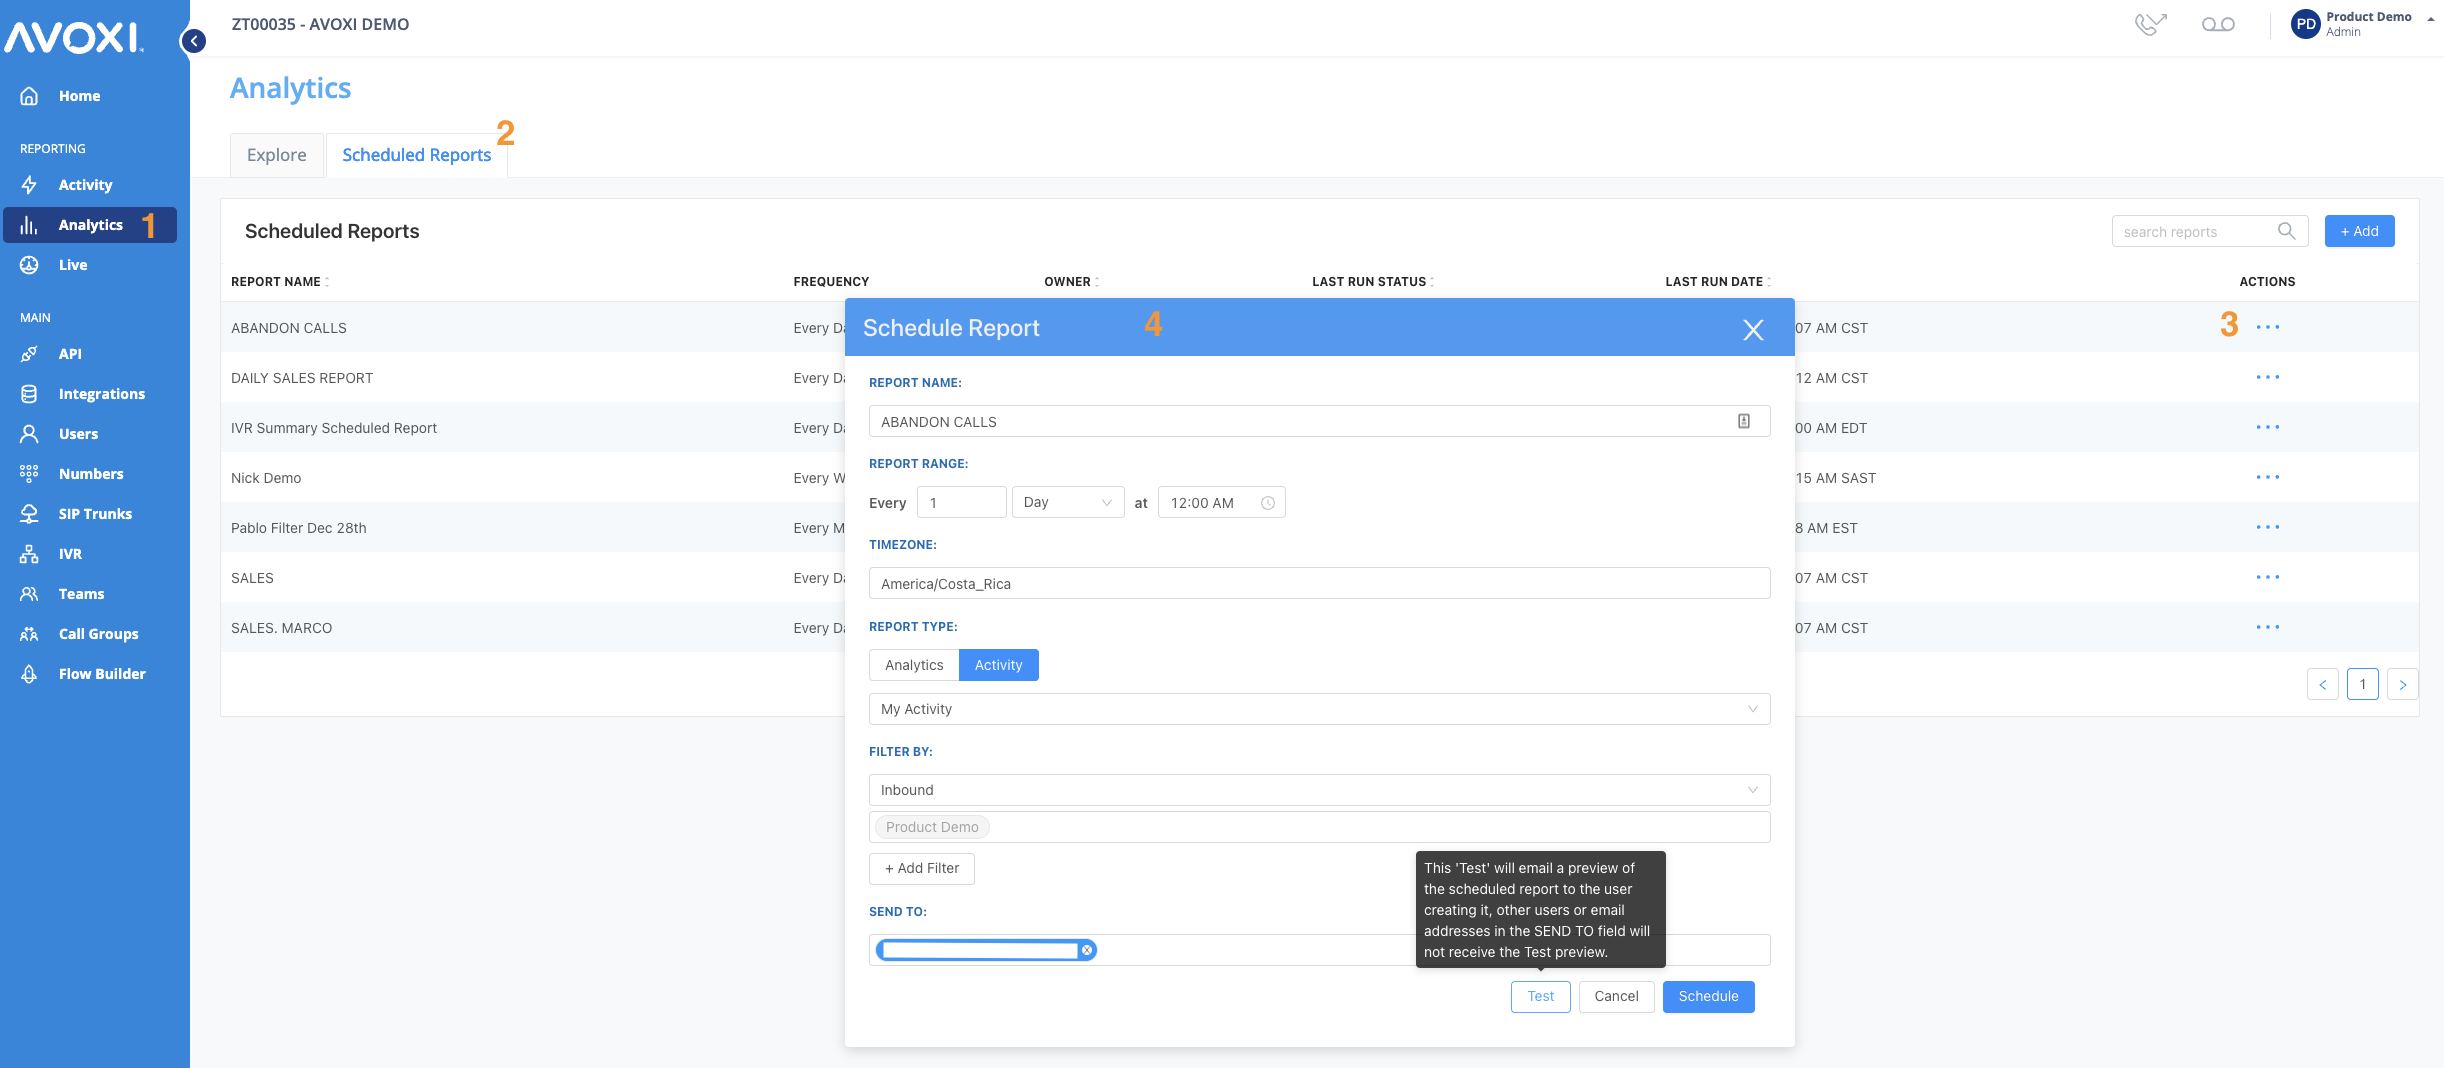
- Send To - Enter the email address(es) reports should be sent to, recipients can be any configured user or valid email address. Reports can also be sent to multiple email addresses.
- Add CSV - Reports will automatically be sent in PDF, but you can choose to add a CSV file to some reports.
- Test - Will email a preview of the scheduled report to the user creating it, other users or email addresses in the SEND TO field will not receive a copy of the test.
-
Schedule - When you are ready to select the "Schedule" button.
NOTE: Use the Share Report or Download feature to share/download real-time metrics.
Viewing and Managing Existing Scheduled Reports
- Select the "Analytics" section on the left-hand navigator.
- Then select the "Scheduled Reports" tab.
- To quickly find the report you require, simply type the report name in the search bar.
- To "Edit / Delete /Test" a scheduled report use the three dots located to the right-hand side of the desired report.

-
Edit - Edit an existing report by selecting the edit option, then updating the information within the pop-up.
- Test - Will email a preview of the scheduled report to the current user.
- Delete - This will automatically delete your scheduled report and can not be undone.
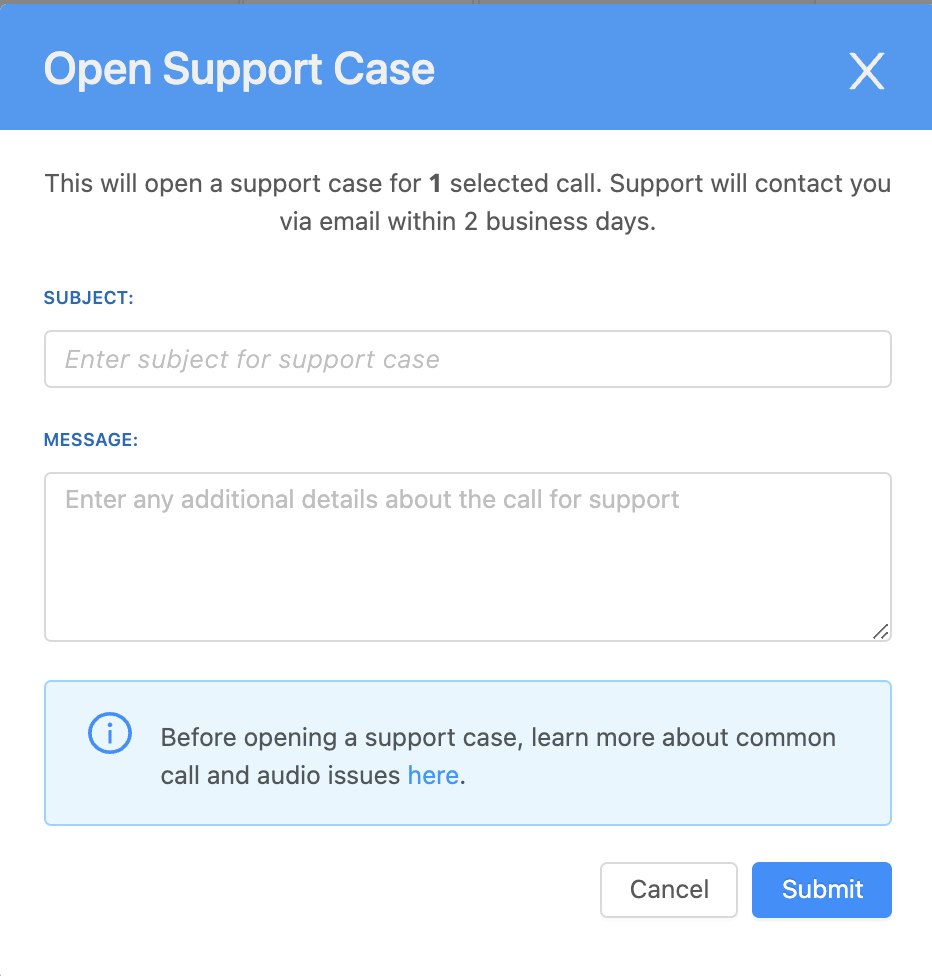
Create a Support Case
With the ability to instantly open a support case from within the dashboard, Admins can immediately report and manage call quality issues. The opened contains all the information needed for AVOXI to being troubleshooting ASAP.
- To open a support case, navigate to the Call as mentioned above Insights Activity dashboard.
- Select one or multiple calls within the last six days you wish to report using the check box.
- Click the "Support Case" button.

- Now create a subject and summary for your support case and "Submit" when ready.
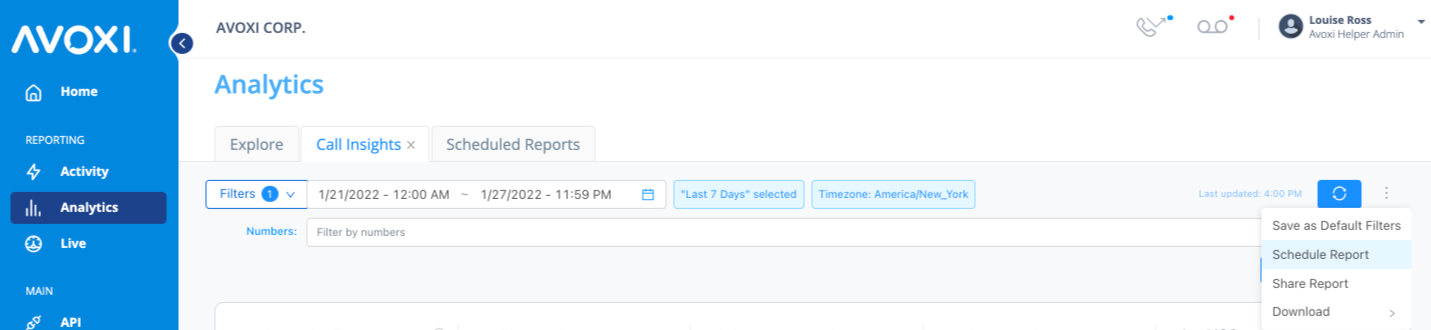
Share or Download Reports
AVOXI Admins can filter data and either download or share reports. Use the below guide to get started:
- First, use the drop-down filters to filter the required data.
- Once you are ready, select the "three dots" located to the right of the date picker.
- Select the "Download," Schedule, Or Share option from the list
- Using "Share Report," you can quickly email the content of any report to other Genius users or external users via email.
- Using "Download" from the option list will automatically download a PDF to your desktop. Please note the system can only download 2500 recorders at a time.
-
Scheduled reports are only available to AVOXI license holders with Admin/Supervisor Roles, allowing them to proactively send prebuilt reports containing relevant business metrics to internal users and specific email addresses at specified intervals.
Learn more about the best ways to troubleshoot and improve VoIP in our informative Call Insights Article!