The AVOXI support portal is designed to provide our customers with a fast and direct way of getting answers to any open or pending cases. Through a self-service portal, the highly efficient tool allows users to quickly open a support case while providing complete visibility to all cases via an easy-to-view dashboard. With the ability to add comments and upload supporting documents or attachments directly within your online portal, there is no longer a need to waste time on follow-up emails or phone calls.
Use our below step-by-step guide to learn more about the Portal Dashboard and how to create a case.
Accessing your Support Portal
- Navigate to your support portal by selecting the “Support Icon” at the top of the navigation.
- In red, you can see the number of cases that are “pending customer action.” "
- You can also view the Support Portal via the “Home section” on the left-hand navigation.
- Under the “Support" tab.
Portal Visibility and User Permissions
The support portal is, by default, visible to all "Admin Role" that have read, write, or edit permissions. These can be adjusted at any time using the role-based access, by changing the “case management” role.
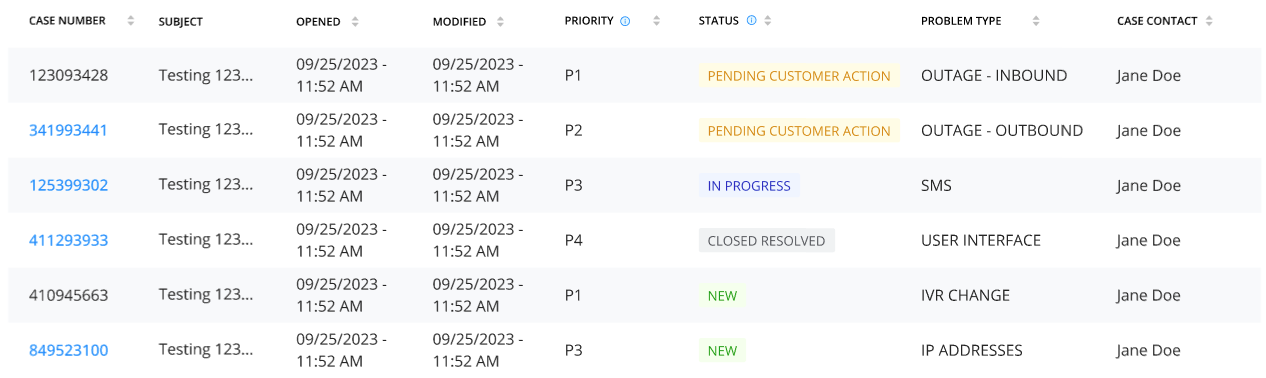
Understanding your Dashboard
The dashboard will give you a high-level view of all cases since May 2023.
Sorting your Dashboard
You can quickly shuffle the view using each column's up and down arrows.
- Case Number: Newest to Oldest
- Subject: Alphabetical order
- Date/Time Opened: Newest to Oldest
- Status: Alphabetical order
- Problem Type: Alphabetical order
- Case Owner: Alphabetical order
Understand each Dashboard Column
-
Case Number
- The case number is a unique number automatically assigned to each case to help track
-
Subject
- The case subject is added at the time of creation.
-
Date/Time Opened
- Date and time the case was opened: by default, the dashboard will use your account timezone.
-
Status
- The status drives the case life cycle and will be updated by the AVOXI Support Agent(s) as they work on the case. This is a vital field to follow; if this is updated to"Pe "ding Customer Action," w" await additional information or examples to troubleshoot further.
-
Priority Type
- Case priority is an assigned priority given to each case; the higher the priority, the higher the score. This is to ensure our support agents work on high-priority items first.
- Note: All new cases will automatically be set to a P1; once graded by an AVOXI Support Agent, this may be updated anywhere between P1 and P4.
-
Case Contact
- The contact person handling the case, can be updated at any time via the case detail page and may differ from the person who opened the case.
Update Portal Information
The portal will automatically update, with the last update time visible next to the"Ope " Case” button. Update your dashboard using the"refresh" button for more accurate information.

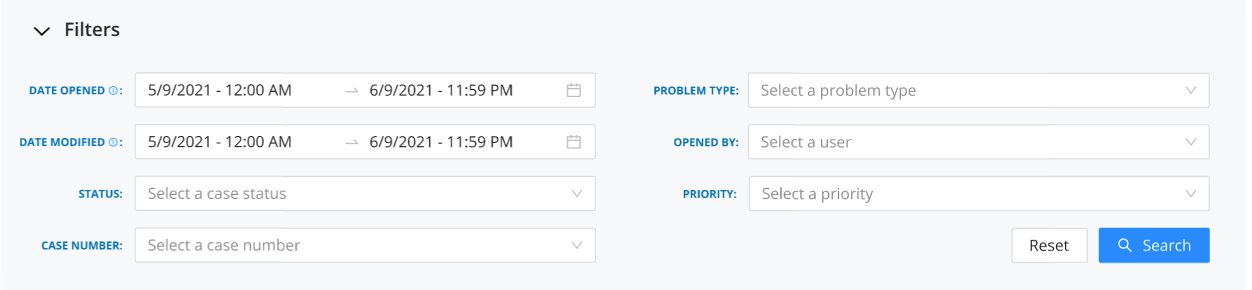
Filtering
-
Date and Timezone
- Use the date picker in the drop-down to select the desired date range.
- By default, the dashboard will use your account Timezone.
-
Problem Type
- Using the drop-down, select the "Problem Type" that you wish to filter by
-
Date Modified
- This is the last date modified
-
Opened By
- Using the drop-down search for cases opened by a particular person
-
Status
- Using the drop-down filter based on case status.
-
Case Number
- Copy and paste or manually add the case you want to look up
Case Detail Page
- Select the blue case number to view your case details page
-
Case Details:
- The case number, date opened, and description will display the information entered when the case opened.
-
Case Updates:
- The Status and Priority of the case will update as it is worked on and will automatically be reflected within the Support Dashboard.
-
Opened By:
- This contact opened the case and is a set field that will not change.
-
Case Contact:
- The case contact can be updated at any time using the drop-down.
-
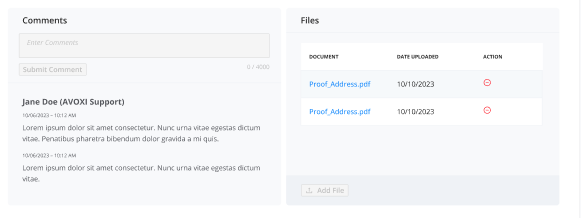
Comments:
- Using the comments box, you can instantly provide further. Information or follow up with your AVOXI support agent.
-
Attachments:
- Using the attachments block to upload support data to assist with troubleshooting steps. You can also delete a file at any time.
Managing Existing Cases
-
Comment Box
- The comment box at the bottom of the Case Details Page allows you to create a comment at any time.
- NOTE: Users can still make a comment or upload on a closed case should the issue reoccur or not be resolved entirely.
- This box will also have a detailed history of all previous comments, relevant dates and times, and the newest case.
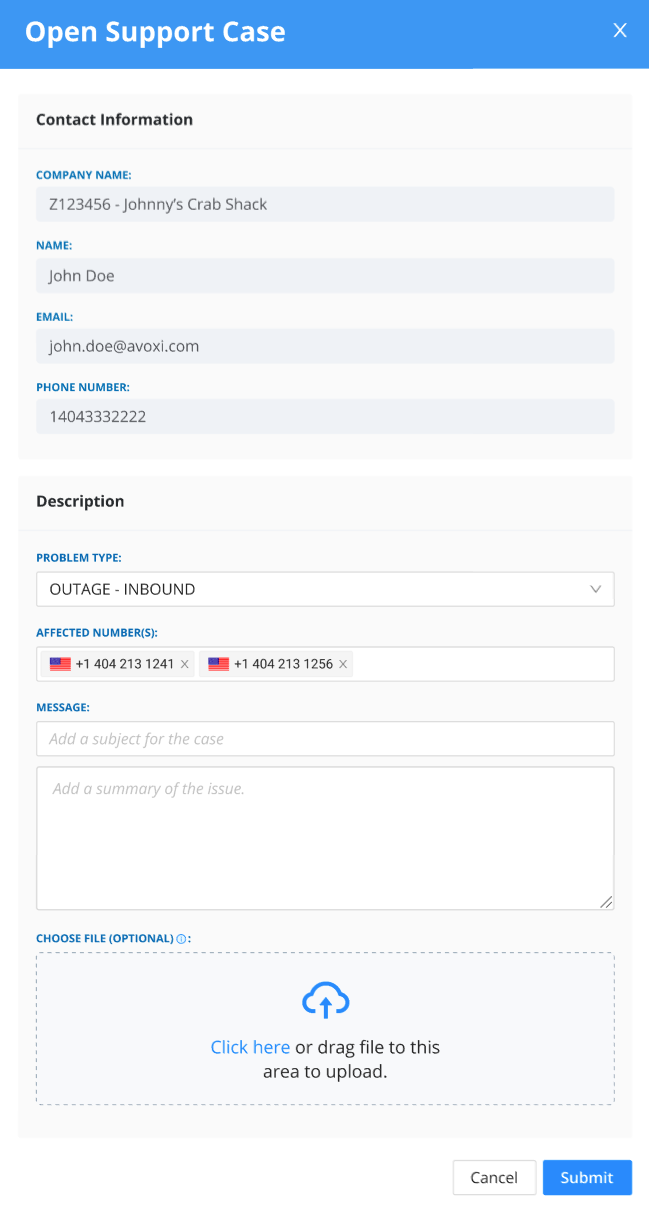
Opening a new Case
- To get started, select the "+Open"Case" butt"n

- Your contact information will auto-populate based on the logged-in users.
-
Problem Type:
- You can select the problem type that best suits the issue you wish to report using the drop-down.
-
Affected Numbers:
- Using the drop-down, select all affected numbers (limited to 10 numbers)
-
Message (Subject):
- Give your case a brief subject
-
Description:
- You can now add a descriptive summary of the issue you wish to report.
-
Submit:
- Once you are sure, you can select the contact “Submit" button to create your case.