The AVOXI webphone is a 100% web-based application available to all Contact and Enterprise license holders. Embedded within the AVOXI platform, is located in the bottom right-hand corner and gives you the ability to make inbound and outbound calls without the need for a physical telephone. Designed for ease of use, no additional software or equipment is required and can be used from any computer with an internet connection.
As previously covered in our Best Practices Guide the webphone is not compatible with use on a tablet, iPad, or mobile device.
Using your Webphone
Your webphone is located in the bottom right-hand corner of your AVOXI platform.

Extension Number
Your user's extension number (2) is visible in the top middle bar.
Agent Status
The "Agent Status" (3) functionality is a popular contact center tool that helps agents show if they are available to field calls or if the call should be redirected to an available agent. AVOXI will automatically route calls based on the "Agent Status" at that particular time. Adjusting your agent status helps your team know if you are available to take a call. As an agent, you can update your status at any time.
Dailpad
Use the ![]() headset icon (4) to return to your dial pad.
headset icon (4) to return to your dial pad.
Contacts
Click on the Contacts (5) icon  to view all internal users with extensions or queues.
Recent Calls
Select the clock (6) icon ![]() to view all recent incoming and outgoing calls. You can select the phone icon
to view all recent incoming and outgoing calls. You can select the phone icon![]() next to a number to quickly redial that number.
next to a number to quickly redial that number.
Settings
Select the "Settings" (7) icon  to view and update the following:
- Auto Answer: TO set your webphone to auto-answer, simply click the toggle to "ON"
- Microphone: Choose your microphone settings and then speak to test it's working.
- Speaker: Choose your speaker and then use the test button to ensure it's working.
Dial Pad
Use the dial pad (8) to dial a number or search internal contacts and then press the phone icon  to place a call.
Outbound Caller ID
As an agent, you can choose your default outbound caller ID (9) in your User Details page under Accounts and Preferences -> My Account -> Overview. All available numbers to use will be in the dropdown labeled 'OUTBOUND CALLER ID'. The number selected in this field will be the default phone number displayed to the person you are calling.

Understanding Call Controls
Below is a breakout of the Call Controls within your Webphone:
Agent Status
It will also show the "agents status" so you know who is available to take a call. Learn more here!
Contact name and number
Using CRM integration the screen pop will automatically display customer information from the CRM platform to your Genius webphone for queue calls with a matching CRM caller-id. This feature is only available to Genius Enterprise Licenses holders and gives Admin users the ability to save their credentials within the Genius platform to enable the connection. They can also enable or disable the screen pop functionality for specific queues to determine which agents can see the CRM information when a queue call comes in. Learn more here!
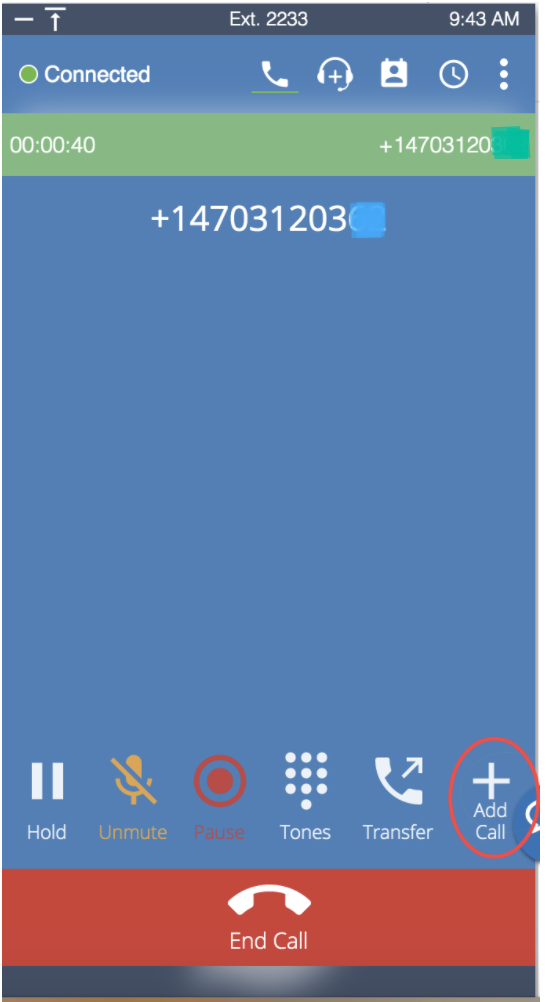
Hold and Mute
Click the mute button to mute a call. When your call is on mute, you can hear the caller, however, the caller cannot hear you.
To place a call on hold, select the hold button. When your call is on hold, you can not hear the caller and the caller can not hear you but will instead hear the hold music.
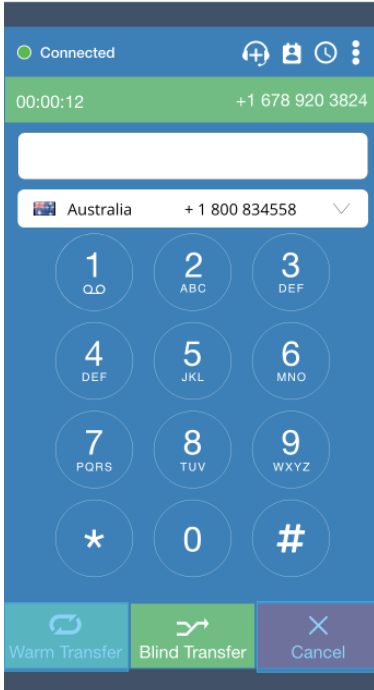
Call Transfer (Warm and Blind transfer to Agents)
When transferring calls you have two options: warm and blind transfer.
With a warm transfer, agents can speak to each other to prepare them with the relevant information before transferring a caller. This feature was designed to enhance the customer experience and also, reduce the call time.
With a blind transfer, agents can transfer callers to a ring group or another agent without speaking to the new agent first. This option is best when you are transferring the call to a queue that has a long wait time.
Pause Call Recording
If call recording is activated all calls will automatically be recorded. Users have the option to "Pause Call Recordings" within the webphone application.
Three-way calling
3-Way calling gives Genius License holders the ability to instantly add a call participant to an existing inbound or outbound calls.
As the call creator you can:
- Speak to the agent or external participant before merging them to an active call
- Swop callers on hold
- Split a three-way call
- Disconnect a participant from the call
Add an external phone number
To add an agent or external phone number to your call, simply click "Add Call" located on the bottom right-hand side of your webphone.
Add an Agent
Add an agent or manager to the call using the contact list or by typing the relevant name/extension number into the search bar. Add them to the call by clicking the " " icon located next to their name.
Genius Tip: Agents that are available will have a green dot next to their name. If the agent has a blue or red dot next to their name are unavailable to join the call.

Adding an External Number
To add an external number, simply type "+" and then select the dial pad number to dial the phone number you wish to add.
Genius Tip: Be sure to dial “+” followed by the country code and number (no spaces or dashes).

Merge Now
- Select "Merge Now", the agent or external number will immediately ring and the existing call participants will be placed on hold.
- Once the call is accepted, the new agent or external participant will automatically be added to the call. All participants can now converse.
Call Participants
- During a conference call, you will be able to see the active participants' details and call duration within your webphone.

Call First
- If you want to speak to the agent or external participant before merging them into the active call, simply select "Call First". The existing call participant will automatically be placed on hold.
- Use the "Swap" icon to place the second caller on hold and speak to the first call participant.
- Genius Tip: This functionality gives you the ability to speak to both call participants independently
- Once you are ready you can select "Merge" to start a three-way conversation.

Once the call is accepted, the new agent or external participant will automatically be added to the call. All participants can now converse.
Split Call
- As the call creator, you can split the three-way call at any time using the "Split Call" icon. This will automatically place the second call participant (the agent or external participant you added to the call) on hold. Use the "Swap" functionality to change which participant is on hold.
- Select "Merge" at any time to re-start a three-way conversation.
- Genius Tip: Should you end the call while it's split, the active call participant will be disconnected (this will not disconnect the call participant on hold).

Ending the Call
If the call creator ends the call while the call is split, the active call participant will be disconnected and the remaining call participant will automatically be taken off hold. When the call creator ends the call, all participants will automatically be disconnected.